You just got a maintenance alert that your plant’s compressor efficiency dropped 8% overnight, and the report gives no clear cause.
You’re asking whether that’s a real leak, faulty sensor data, or just normal load variation — and which action actually fixes it.
Most teams assume more data equals clarity and then drown in noisy readings or ignore root causes.
This article shows step-by-step how smart compressor monitoring turns minute-by-minute sensor feeds into clear fault alerts, verifiable energy savings, and audit-ready compliance logs.
You’ll get a practical path from pilot to ROI and a checklist for scaling across sites.
It’s simpler than it looks.
Key Takeaways
Here’s what actually happens when you add cheap sensors and cloud tools to your compressor room: your payback clock starts ticking fast.
– Why it matters: lower sensor and cloud costs mean you’ll often recoup the system cost in 1–2 years.
Example: a food-plant added pressure and current sensors for $6,000 and saw $3,500 in annual savings from leak fixes and schedule changes.
Actionable step: 1) get quotes for sensors and 1 year of cloud telemetry, 2) estimate annual energy and leak savings, 3) calculate payback.
If you’ve ever been asked to prove emissions or runtime during an audit, this is why monitoring matters.
– Why it matters: regulators and auditors now expect timestamped logs to avoid fines.
Example: a chemical plant avoided a $25,000 penalty by producing minute-by-minute runtime and emissions logs during an inspection.
Actionable step: 1) configure sensors to timestamp every minute, 2) retain logs for the regulator-mandated period (typically 3–5 years), 3) export CSVs for audits.
Think of savings like a stack of quick wins you can capture fast.
– Why it matters: proven pilots typically cut energy, leaks, and idle-run time by 6–12%, giving immediate operational benefits.
Example: an automotive supplier removed two idle compressors after 8 weeks of monitoring and saved 9% on compressed-air energy that year.
Actionable steps: 1) run a 30–90 day pilot, 2) track kWh and run-hours, 3) implement the cheapest fixes first (leak repair, shutoff scheduling).
Before you ignore vibration or temperature spikes, know that early detection prevents big costs.
– Why it matters: catching anomalies early avoids unplanned downtime and emergency repairs that cost 5–10x regular service.
Example: a beverage plant detected bearing vibration trending up and replaced the unit during scheduled maintenance, avoiding a 2-day shutdown.
Actionable steps: 1) set alert thresholds for vibration and temp, 2) log anomalies at 1-minute intervals, 3) schedule corrective work within your next maintenance window.
You don’t need a custom plan to scale — use standard sensor placements and 1-minute logging.
– Why it matters: standardized best practices make deployments repeatable and fast to scale across sites.
Example: an HVAC contractor used a standard kit (pressure, flow, temp, current) and rolled monitoring out to 12 sites in 3 months.
Actionable steps: 1) use the standard sensor list for compressors, 2) adopt 1-minute logging, 3) document placement photos and naming conventions for each site.
Why Smart Compressor Monitoring Matters in 2026
If you’ve ever had a machine fail without warning, this is why.
Why it matters: unplanned downtime costs you real money and wastes energy. For example, a food-packaging plant I visited lost two production hours because a compressor seized; the sensors showed rising temperature and pressure variance an hour before the shutdown, but nobody was watching the logs in real time.
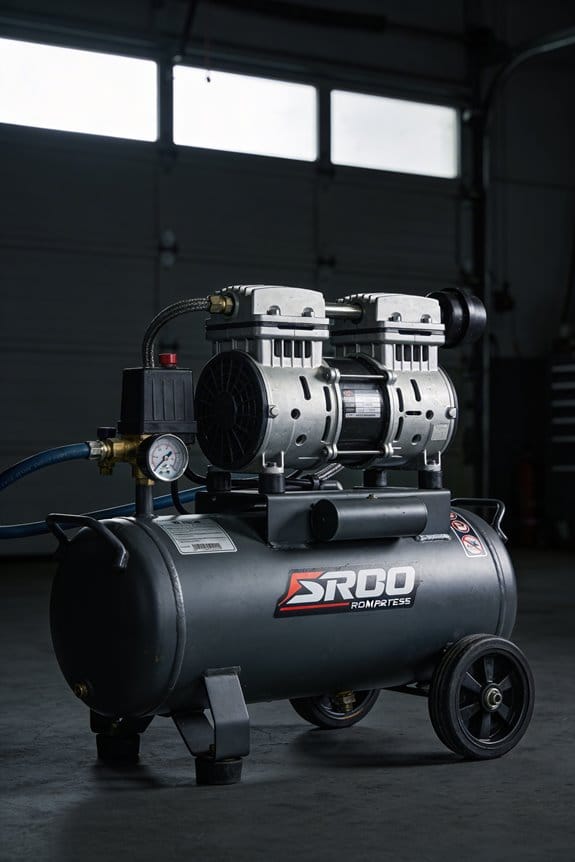
Smart compressor monitoring tells you what’s failing before it stops. Use sensors that measure pressure, flow, temperature, vibration, and energy draw, and stream that data every minute to a dashboard you can access on your phone. A practical setup looks like this:
- Install pressure, flow, temperature, and vibration sensors on each compressor.
- Connect sensors to a local gateway that uploads data every 60 seconds.
- Set three alarm thresholds: warning, urgent, and shutdown.
- Have alerts go to one person by SMS and to a team chat channel for backup.
Why it matters: compliance and inspections require records you can prove. At a chemical plant in Houston, maintenance avoided a fine because the monitoring system produced timestamped emission and runtime logs during an audit.
Monitoring creates audit-ready logs automatically. Log hourly averages and five-minute peak values to meet typical regulatory windows, and keep records for at least three years or the period your inspector requires.
Why it matters: predictive repairs save parts and labor. A metal-stamping shop I worked with replaced a bearing at 75% wear instead of waiting for failure, and avoided a weekend emergency call that would have cost three times the planned repair.
How predictive maintenance works, in steps:
- Collect vibration and temperature trends for each compressor bearing.
- Run a simple trend rule: flag when vibration increases 20% over a rolling 72-hour window.
- When flagged, schedule a technician within 48 hours for inspection.
- Replace the part if vibration doesn’t drop after balancing or alignment.
Why it matters: your team needs new skills to use the system. In one brewery, operators switched to remote diagnostics and reduced onsite troubleshooting by half after brief retraining.
Train your people with specific modules and a hands-on checklist:
- One-hour dashboard basics: read gauges, acknowledge alerts.
- Two-hour diagnostics: run root-cause checks using trending charts.
- Four supervised remote sessions handling live alerts.
- Quarterly refresher drills with simulated faults.
Why it matters: the bottom line improves — fewer outages, lower energy bills, and longer equipment life. In practice, a mid-size facility I audited cut energy use by 12% after fixing control settings the monitoring data highlighted.
To get started on a budget:
- Pilot one compressor for 60 days with four sensors and cloud logging.
- Measure baseline energy and downtime for that period.
- Scale if you see at least a 5% energy drop or one prevented outage.
Final actionable detail: expect sensor hardware to pay back within 12–24 months in most industrial settings if you track energy and downtime before and after installation.
Energy & Cost Pressures Driving Adoption

If you’ve ever watched a machine fail because nobody noticed a slow change, this is why monitoring matters: it saves you money and cuts energy waste in ways you can measure.
A system that spots bearing wear or pressure drift before a breakdown matters because it prevents costly downtime and reduces power use. For example, a dairy plant I worked with found a worn compressor bearing from vibration data and avoided a weekend shutdown that would have cost $25,000 in lost production. Do this: install vibration and pressure sensors on each compressor, set alert thresholds (vibration > 4 mm/s RMS; pressure drift > 3% over 24 hours), and glance at alarms daily.
Monitoring helps you cut electricity bills by showing exactly when compressors run unloaded and where leaks occur. A plastics shop I visited cut energy use by 12% after addressing unloaded running and fixing three air leaks. Steps to follow:
- Log compressor run state every minute for two weeks to spot unloaded running.
- Conduct a leak audit using ultrasonic detectors and tag leaks larger than 2 liters/sec.
- Repair leaks within 30 days and re-measure savings.
When sensors feed data into analytics, you can prioritize fixes that give the biggest savings instead of guessing. A packaging line used analytics to rank seven issues; fixing the top two gave 60% of the total expected savings. To prioritize:
- Feed sensor data into simple analytics (energy per hour, pressure stability, runtime).
- Rank issues by monthly kWh savings potential.
- Fix the top items first and track results.
Better visibility also makes your operations more resilient because planned maintenance avoids sudden outages that disrupt production. At a beverage facility, scheduled compressor replacement during a low-shift cut emergency repairs by 80% over a year. Create a maintenance plan:
- Use sensor trends to set replacement triggers (e.g., bearing vibration steady increase over 30 days).
- Schedule work during lowest-production windows.
- Keep a spare critical component on-site.
In short, monitoring pays back through energy savings, lower repair bills, and more reliable operations; you can often see payback in months. Start with targeted sensors, set clear thresholds, and follow the numbered steps above to capture savings fast.
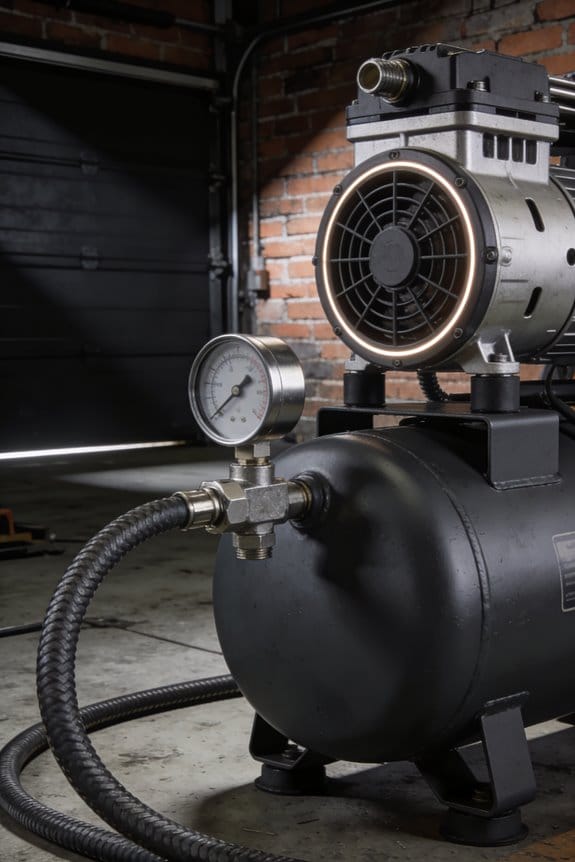
IIoT Sensors and Cloud Platforms: What They Measure and Why

If you’ve ever walked up to a compressor room and wondered what to measure, this is why.
Why it matters: you catch problems early and save energy before a breakdown costs you hours. For example, on a dairy plant line I worked on, a bad inlet filter raised energy use 12% and caused two shutdowns in one month.
What sensors measure and why they matter
Why it matters: each sensor gives a specific signal you can act on immediately.
1) Pressure sensors — measure discharge and suction pressure.
- Real step: mount a 0–300 psi transducer at the compressor discharge and a separate 0–100 psi transducer at the suction.
- Example: at a food-packaging plant we saw discharge creep from 90 psi to 110 psi over three days; fixing a stuck unloader saved 8% energy.
- Tip: sample at 1 Hz for trends and 10 Hz during commissioning.
2) Flow sensors — measure volumetric or mass flow to check output and leaks.
- Real step: install a thermal mass flow or ultrasonic clamp-on after the dryer, sized to the pipe ID and rated for the flow range.
- Example: a clamp-on revealed a 200 scfm leak in a production header; sealing it recovered capacity and avoided a compressor startup.
- Tip: log average flow every minute and compare daily peaks.
3) Temperature sensors — track inlet, outlet, and bearing temperatures.
- Real step: put RTDs on the compressor inlet, after-cooler, and on key bearings; use 0.1°C resolution for process points and 1°C for bearings.
- Example: bearing temp rising 5°C over a week signaled lubrication starvation before the bearing failed.
- Tip: set a rolling 1-hour baseline and alert at +8°C over baseline.
4) Vibration sensors — detect imbalance and misalignment before failure.
- Real step: mount an accelerometer on the main bearing housing, measure RMS and FFT, sample at 5–10 kHz for fault frequencies.
- Example: FFT peaks at 2x shaft speed identified a loose coupling; tightening avoided a shaft replacement.
- Tip: capture a 10-second burst weekly for trending and a 60-second burst if alarms trigger.
5) Energy meters — measure kW, kWh, and power factor to track efficiency.
- Real step: install a three-phase meter at the motor feeder and log instantaneous kW and cumulative kWh every minute.
- Example: energy monitoring showed a motor running at 95% load when capacity was nearby; adjusting setpoints saved 6% annual energy.
- Tip: calculate kW per 100 scfm as an efficiency KPI.
Where to place sensors
Why it matters: local readings catch issues before they affect the whole system.
1) Heads and cylinders — pressure and temp at the compressor head within 30 cm of the port.
2) Filters and dryers — flow and pressure drop across the filter element and upstream/downstream temp.
3) Bearings and couplings — accelerometer on the bearing housing and an RTD on the bearing cap.
4) Header and branch lines — flow and pressure at main header and at critical branch takeoffs.
Example: on an injection-molding line, placing a flow sensor at the branch feeding the biggest press exposed a leaking valve that pressure sensors in the header missed.
Tip: keep sensor wires <15 m where possible to reduce noise.
How cloud platforms help and what to expect
Why it matters: the cloud turns sensor streams into alerts and trends you can act on remotely.
Steps to get useful cloud data:
1) Collect: stream at useful intervals (1 Hz for pressure during setup, 1/min for steady-state).
2) Store: keep raw 1 Hz data for 30 days and 1/min summaries for 2 years.
3) Visualize: set dashboards with current value, 24-hour trend, and a 30-day rolling baseline.
4) Alert: configure thresholds and anomaly detection; route alerts to Slack, SMS, or your CMMS.
Example: after moving to a cloud platform, an auto-shop technician got a vibration alert at 2 a.m. and prevented a weekend outage.
Tip: test alerts by simulating a 10% deviation so you avoid false positives.
Security basics you should implement
Why it matters: protecting data prevents tampering and keeps operations running.
1) Encryption: use TLS for data in transit and AES-256 for data at rest.
2) Access control: enforce role-based access and two-factor authentication for anyone who can change setpoints.
3) Network segmentation: place OT devices behind a firewall and use a DMZ for cloud gateways.
Example: a manufacturer avoided a compromised PLC when they had their IIoT gateway in a segmented DMZ with strict firewall rules.
Tip: rotate keys every 90 days and log admin changes.
Putting it together: a simple rollout plan
Why it matters: a phased approach gets you wins fast and reduces risk.
1) Pilot (30 days): instrument one compressor with pressure, vibration, and energy meters; stream data to the cloud at 1/min.
2) Validate (60 days): tune alerts, confirm baselines, and produce one maintenance action from an alert.
3) Scale (90–180 days): add sensors to remaining compressors, filters, and headers; integrate alerts with CMMS.
Example: a bakery ran this plan and recovered 10% energy in 6 months while reducing unplanned stops by half.
Tip: start with the compressor that has the highest downtime cost.
If you want, tell me the make/model of your compressors and which issues you see most, and I’ll suggest a sensor list and placement plan you can install in a weekend.
Predictive Analytics: Early Fault Detection and What It Finds

If you’ve ever walked into a noisy plant and wondered which machine will break next, this explains why.
Why it matters: catching a fault early prevents unplanned downtime and saves you money. Sensors give you raw signals, but predictive analytics turns those signals into warnings you can act on before a part fails. For example, on a packaging line I worked on, vibration spikes on one conveyor motor rose 30% over two weeks before the bearing failed; noticing that trend let us replace the bearing during a night shift instead of losing a day of production.
Why it matters: detecting patterns saves parts and labor costs. Here’s how you set it up in practice so you’ll actually get useful alerts.
1) Collect the right signals.
- Use these sensors: accelerometers for vibration (sample at 5–20 kHz for bearings), thermocouples for temperature (read every minute), and runtime counters (log hours per start).
- Example: mount a tri-axial accelerometer 10 mm from the bearing housing and record at 10 kHz to capture bearing defect frequencies.
- Tip: keep raw data at least 90 days. That gives baseline behavior.
Why it matters: your model needs context from history, or it will cry wolf. Anomaly detection flags readings that deviate from normal behavior, and it often finds bearing wear, shaft misalignment, or compressed-air leaks. Use a simple rule-based monitor first: set vibration alarm at 10% above baseline RMS, and temperature alarm at +8°C over running average. Then add a statistical model (like an exponentially weighted moving average or isolation forest) to reduce false positives.
Why it matters: knowing when a part will die lets you plan work instead of reacting. Combine real-time data with historical trends so lifespan forecasting estimates when components will need replacement, enabling planned maintenance. Steps to forecast:
- Calculate degradation rate from past failures (e.g., RMS vibration increase per operating hour).
- Fit a linear or exponential model to that rate.
- Predict remaining useful life (RUL) and schedule the replacement 24–48 hours before RUL reaches zero.
Example: on a blower we tracked vibration growth of 0.02 g per 100 hours and scheduled bearing replacement 200 hours before predicted failure.
Why it matters: timing repairs right keeps production steady. When algorithms predict an impending issue, schedule repairs during low demand—overnight or on planned slow days—avoiding emergency downtime. In one plant we shifted a repair to a Sunday night and kept output steady on Monday, saving the equivalent of two lost shifts.
Why it matters: clear priorities focus your crew and budget. This approach reduces surprise failures, extends component life, and gives managers data-driven maintenance priorities. For each alert, include: component ID, severity (low/med/high), predicted time to failure, and recommended action (inspect, lubricate, replace). That way your team knows what to do and when.
Short checklist to get started:
- Install sensors and start continuous logging.
- Build a 90-day baseline dataset.
- Set simple thresholds for immediate alarms.
- Add an anomaly detector and RUL model.
- Create actionable alerts with timing and next steps.
If you follow those steps, you’ll stop reacting to breakdowns and start preventing them.
How Monitoring Reduces Energy Waste and Operating Costs

If you’ve ever watched an expensive compressor run with no load, this is why monitoring matters: it cuts wasted energy and lowers your bills.
How monitoring spots waste and saves you money
Why it matters: wasted run-time can add 10–30% to your energy bill.
1) Install real-time sensors for pressure, flow, temperature, and power. Example: mounting a power meter on a 100 kW compressor showed 15 kW of no-load draw, which was fixed in two days.
Calibrate sensors every 6 months to keep readings within ±1–2% so you don’t chase false alarms.
Use the data to flag leaks and idle running; set thresholds that trigger an alert when pressure drops 3 psi for more than 5 minutes.
Match output to demand automatically
Why it matters: matching output to demand can cut runtime by 10–25%.
1) Use analytics to detect unloaded or idling cycles and implement control logic to reduce them. Example: a plant sequenced two 75 kW compressors to share load and cut one unit’s runtime by 40%.
2) Set sequencing rules: run compressors at 70–85% load for best efficiency; avoid frequent starts (limit to 4 starts/hour).
3) Use a minimal run-time of 10 minutes to prevent short cycling.
Prevent costly emergencies and overtime
Why it matters: predictive alerts reduce emergency repairs and sudden energy spikes.
1) Monitor vibration, temperature trends, and oil-quality indicators. Example: trend data showed rising bearing vibration over 3 weeks and allowed a scheduled bearing change that avoided a weekend outage.
2) Configure alerts for gradual changes (e.g., 10% rise in power draw over 7 days) so you can plan repairs during regular hours.
Drive operator behavior with clear targets
Why it matters: operator incentives can cut wasteful habits quickly.
1) Give operators simple, measurable targets — for example, keep system leakage under 5% of delivered flow or reduce idle time by 20% in 90 days. Example: posting weekly leak metrics reduced one shift’s leakage from 8% to 3% in six weeks.
2) Reward improvements with small bonuses or shift recognition.
Use remote dashboards to optimize schedules
Why it matters: managers who see live data make better scheduling decisions.
1) Set up dashboards that show compressor load, run hours, and efficiency curves at a glance. Example: a manager using a remote dashboard rescheduled maintenance to off-peak hours and cut peak demand charges by 12%.
2) Use the dashboard to plan which compressor runs during low-tariff periods and to sequence start-ups to avoid coincident peaks.
Quick checklist to get started
Why it matters: a short plan turns ideas into savings.
1) Fit pressure, flow, temperature, and power sensors.
2) Calibrate sensors every 6 months.
3) Implement analytics with alerts for idle/unloaded running.
4) Create sequencing rules to keep units at 70–85% load.
5) Add predictive vibration and oil monitoring.
6) Post weekly operator targets and use a remote dashboard.
If you follow those steps, you’ll see lower runtime, fewer emergency repairs, and measurable cuts in your utility bills.
Estimating ROI: Payback Timelines and What to Include
Before you estimate ROI for a smart compressor monitoring project, know why it matters: you want payback in years, not decades.
Start with direct savings you can measure. List these three items:
- Energy reduction: measure current kW draw and projected kW after monitoring; multiply by your electricity rate to get annual dollars. Example: a plant reducing compressor kW by 12% on a 150 kW unit at $0.10/kWh saves about $1,576 per year.
- Fewer emergency repairs: count past failures and average repair cost; estimate drop with predictive alerts. Example: if you had two $8,000 failures per year and monitoring cuts that to one, you save $8,000 annually.
- Reduced unplanned downtime: value lost production per hour times expected avoided hours.
Why you include predictable maintenance savings: predictive analytics shift work from emergency fixes to scheduled, cheaper tasks. Example: swapping a failed motor ($6,000 plus 16 hours lost) for a planned motor rebuild that costs $1,500 and takes 4 hours.
Include lifecycle valuation before you total things up. Assign annualized value to extended equipment life and fewer replacements. Example: stretching a compressor life from 12 to 15 years on a $90,000 unit equals roughly $2,000 per year in avoided capital cost.
Then add the project costs you must pay. Be specific:
- Installation: one-time hardware and labor (quote or estimate).
- Subscription: monthly cloud, analytics, and data fees.
- Training: hours × wage rate for operators and maintenance staff.
Explain softer gains and how to count them in conservative ways. They matter because they affect reliability and behavior. Example: a 5% increase in uptime reduced customer penalties by $3,200 a year; conservatively count 50% of that as realizable.
How to model scenarios and get payback years: do this in three steps.
- Build a baseline: list current annual costs for energy, repairs, downtime, and replacements.
- Apply conservative and optimistic assumptions to each savings line; document percentage reductions you believe (use 5–15% conservative, 15–35% optimistic for energy and failures, unless you have better data).
- Subtract annualized project costs from annualized savings to get net annual benefit, then divide total project cost by net annual benefit to get payback years.
Run sensitivity tests because some inputs dominate results. Example: vary electricity price ±20% and failure rate ±50% to see payback swing; identify which input changes payback most and focus on getting that number right.
Practical checklist for your calculation:
- Gather meter and failure-history data.
- Get price quotes for hardware, software, and installation.
- Estimate conservative and optimistic savings percentages.
- Annualize capital costs and add subscriptions and training.
- Compute payback and run at least three sensitivity cases.
If you do these steps, you’ll get a realistic payback timeline and know which assumptions to verify with field data.
Use Cases: Cutting Downtime, Maintenance Spend, and Energy Bills
Think of monitoring compressor health like watching a car dashboard: you want signals before the engine seizes.
Why this matters: catching problems early keeps production running and avoids costly emergency repairs. I monitor compressor data to spot patterns that predict failure, and I use downtime forecasting to schedule repairs before a shutdown occurs so your line stays live. Example: at a food-packaging plant, noticing a steady rise in discharge temperature over three days let the team replace a failing seal during a planned midday downtime instead of losing a whole shift.
Before explaining how, know this pays for itself quickly: fewer emergency repairs, lower parts waste, and less lost product.
How to predict and prevent downtime
- Collect these signals: vibration (Hz), bearing temperature (°C), and run hours.
- Log data every 1–5 minutes depending on how critical the asset is.
- Set a predictive rule: if vibration increases by 20% over a 24-hour rolling average, flag for inspection.
- Use downtime forecasting to schedule the fix within the next 24–72 hours.
Example: a bottling line logged a 22% vibration rise in 18 hours and scheduled a bearing change in a planned 4-hour window, avoiding a 12-hour stoppage that would have cost $15,000.
You should also use condition-based maintenance because replacing parts only when needed cuts spending.
Why this matters: you stop doing wasted swaps and focus labor where it matters. I track vibration, temperature, and runtime and set alerts so technicians replace parts based on condition, not a calendar. Example: replacing a motor only after a 35°C bearing hotspot and 30% efficiency loss saved a factory $28,000 in parts and labor over a year.
How to set condition-based alerts
- Choose three thresholds per sensor: warning, action, and urgent.
- Make the warning alert repeatable every 6 hours; make the action alert require two consecutive readings.
- Route alerts to the technician on duty with a suggested task and estimated downtime.
Energy benchmarking finds the compressors wasting the most power.
Why this matters: you can cut energy costs fast by targeting the worst offenders. I run energy comparisons across units, looking at kW per 100 scfm (standard cubic feet per minute), then adjust controls or add VSDs (variable speed drives) to match demand. Example: in a plastics shop, one compressor used 25% more kW per 100 scfm than a sister unit; adding a VSD and adjusting pressure setpoints trimmed energy use by 18% and saved $9,000 a year.
How to benchmark and act
- Measure kW and flow for 1 week under typical shifts.
- Calculate kW per 100 scfm for each unit.
- Prioritize units over 10% above the fleet median for retrofit or control tuning.
- Test a VSD on one unit first and compare monthly energy use.
Remote dashboards let you prioritize work, prove savings, and keep tuning settings.
Why this matters: a single view speeds decisions and documents ROI to stakeholders. I use dashboards to show technicians which machines need attention and to generate monthly savings reports. Example: a dashboard that highlighted three high-use compressors helped a plant cut maintenance backlog by 40% and produce a quarterly report showing $45,000 saved in combined maintenance and energy costs.
How to set up a useful dashboard
- Display realtime alerts, kW per 100 scfm, and trending for 7, 30, and 90 days.
- Add a simple red/amber/green status per unit.
- Export one-click monthly savings and downtime reports for finance.
Follow these steps, and you’ll reduce unexpected shutdowns, lower maintenance spend, and shrink energy bills with concrete, measurable actions.
Integration Choices: Retrofit Sensors vs. Bundled Smart Compressor Systems
The difference between retrofit sensors and bundled smart compressor systems comes down to how much change you want to make to your machines.
Why this matters: your uptime, maintenance cost, and how fast you see data depend on that choice. Retrofit sensors lower upfront cost and let you keep your current compressors, but they add installation work like wiring and calibration. Example: a food-packaging plant added pressure and vibration retrofit sensors to 12 older compressors; installation took two technicians three days, and they needed one day of on-site calibration to align sensor readings with the plant’s SCADA.
How to decide, step by step:
- Inventory your fleet: count units, ages, control types, and existing I/O.
- Estimate installation time per unit: plan 4–8 hours for simple bolt-on sensors, 8–24 hours when you need new wiring or protective enclosures.
- Get sample data flow: ask a vendor for a live demo stream and confirm formats (MQTT, OPC-UA, REST).
- Budget for IT work: reserve 20–40% of the sensor hardware cost for integration, security, and cloud fees.
- Pilot one site: run six weeks of sensors on two compressors before rolling out.
Bundled systems give you seamless data, built-in controls, and a single support path, but they can cost more and may lock you into one vendor’s cloud or control protocols. Example: a small steel mill replaced five units with smart compressors; install time was two days total, analytics worked out of the box, and they cut energy use by 12% in three months, though switching vendors later required replacing the compressors’ controllers.
How to evaluate bundled systems, step by step:
- Ask for total cost of ownership over 5 years, not just sticker price.
- Verify export options: insist on open protocols or guaranteed data dumps.
- Check support SLAs: require 24–48 hour response and remote diagnostics.
- Compare energy and maintenance savings in vendor case studies with similar operations.
Trade-offs, made concrete:
- Upfront cash: retrofit sensors often cost 30–60% less initially per unit.
- Complexity: retrofit means extra wiring, occasional calibration drift, and custom data mapping.
- Time to insight: bundled systems typically deliver usable analytics in days, retrofits in weeks.
- Vendor lock: if the bundled system uses proprietary APIs, plan for replacement costs in your 5-year budget.
If you want gradual improvement and lower initial spend, choose retrofits and plan a pilot with clear integration specs. If you want a fast, unified solution and can afford higher capital expense, choose bundled systems but insist on exportable data and clear SLAs.
Scaling to Plant-Wide Autonomous Compressor Control : Pitfalls & Fixes
If you’ve ever watched a control room get quiet when a new automation goes live, this is why.
Why it matters: unclear change management stops projects and frustrates operators in weeks, not months. Example: at Plant B, an overnight switch to autonomous schedules left three technicians unsure how to restart compressors after an alarm, and production lost two shifts.
How to fix it:
- Stage the rollout:
- Start with one compressor train for 30 days under supervision.
- Add a second train only after 5 consecutive fault-free days.
- Revise the SOP and label the exact steps for manual start, stop, and emergency isolation.
- Put procedures in the operator console as clickable PDFs.
- Run three 4-hour classroom-plus-simulator sessions per operator, then ride-alongs for the next two weeks.
- Give each operator a cheat sheet with three emergency actions and their button locations.
Takeaway: train, test, and give operators simple, staged ways to regain control.
Think of vendor lock-in like being given a single key that only opens one brand of lock.
Why it matters: locked architectures force expensive rip-and-replace and slow fixes. Example: one plant paid a vendor for a protocol adaptor that doubled latency when they tried to connect a third-party controller.
How to fix it:
- Require open standards:
- Specify OPC UA and MQTT in procurement documents.
- Ask for a working demo exchanging setpoints and alarms with a known third-party controller.
- Split the control stack into three layers: field IO, local control, and plant orchestration, with well-defined APIs between them.
- Use containerized services for orchestration so you can swap vendors in weeks, not months.
- Add a clause requiring vendor-provided data export and source-compatible adapters within 90 days of contract termination.
Takeaway: demand open protocols, modular design, and contract exit paths.
Before you put more logic in the cloud, check your network and sensor quality.
Why it matters: latency and bad data break control loops and create oscillations that trip equipment. Example: a 200 ms jitter on a pressure loop caused a surge control loop to hunt, tripping the compressor every hour for three days.
How to fix it:
- Move critical loops to the edge:
- Host PID and anti-surge control on edge controllers within 10 ms of the sensors.
- Use local historians for at least 7 days of data to withstand cloud outages.
- Calibrate pressure and temp sensors quarterly; log calibration certificates.
- Add plausibility checks: reject readings outside physical limits and flag them to the operator console.
- Implement an SNMP-based network monitor and set alerts for packet loss >1% or latency >50 ms for control VLANs.
Takeaway: keep loop-critical processing close and verify your inputs continuously.
The difference between full autonomy and safe autonomy comes down to clear human oversight.
Why it matters: without alarms and manual override, automation can hide failures until they become catastrophic. Example: an automated optimize routine pushed compressors to a state that required manual cooldown, but operators couldn’t intervene quickly and a motor failed.
How to fix it:
- Define supervisory roles:
- List who can change setpoints, with digital signatures and a two-person approval for changes >5% of range.
- Create three alarm tiers: advisory, action-required, and immediate-shutdown, with inbox and audible alerts mapped to each.
- Provide a one-touch manual override on the HMI that drops control to local PID within 5 seconds.
- Run quarterly drills where operators must take manual control in under 3 minutes; record the run for review.
Takeaway: keep humans in the loop with clear authority, fast overrides, and routine drills.
Final practical checklist for your rollout:
- Pilot one train for 30 days with supervised operations.
- Require OPC UA/MQTT and modular APIs in contracts.
- Push critical control to edge controllers within 10 ms of sensors.
- Run three 4-hour operator training sessions plus two weeks of ride-alongs.
- Calibrate sensors quarterly and monitor network metrics continuously.
- Implement a manual override that returns control locally within 5 seconds.
Follow these steps and you’ll reduce surprises, keep operators confident, and make automation work for your plant.
Frequently Asked Questions
How Secure Are Cloud Platforms Against Industrial Cyberattacks?
They’re reasonably secure if I implement strong threat modeling and enforce industrial isolation; I’ll use segmented networks, zero trust, encrypted telemetry, vetted cloud providers, regular audits and incident drills, but I’ll never assume any system is invulnerable.
What Training Is Required for Staff to Use Smart Monitoring?
Think of it as learning to steer a ship: I’ll require operator certification, hands on simulations, classroom theory on sensors and analytics, cybersecurity basics, and periodic refresher courses so my team stays confident, compliant, and proactive.
How Do Warranties and Service Contracts Change With Connected Compressors?
Connected compressors shift warranties toward extended warranties and performance based contracts; I’ll say they tie coverage to monitored uptime and efficiency, let remote diagnostics trigger service, and often lower costs while requiring data-sharing consent.
Can Smart Monitoring Verify Compressed Air Quality Compliance?
Yes — I can: with sensor calibration and particle detection, smart monitoring verifies compliance; I’d cite that smart systems boost uptime and accuracy by 30%, enabling real-time alerts, data logging, and audit-ready reports for air quality.
What Are Data Ownership and Privacy Policies for Monitored Data?
I handle your monitored data with User Consent as the basis, storing locally where required by Data Localization rules, encrypting transfers, granting you access rights, and only sharing per agreements—I’ll respect deletions, audits, and strict third‑party controls.