You just finished cutting a tight inside corner for baseboard and can’t get the nail to sit without splitting the wood or leaving a dent — what’s the right tool and fastener so the trim stays tight? Or you’ve nailed a window casing only to find gaps or dimpled paint that mean hours of putty work later.
Most people assume hand nailing or a generic brad gun is good enough and blame their skill instead of the wrong nailer and settings. This piece will show you which finish nailer style and gauge to use for each trim situation, how to set depth and pressure for clean, repeatable results, and how to avoid splits and excess filler so paint goes on smoothly.
You’ll get clear, practical choices and simple setup steps. It’s easier than it looks.
Key Takeaways
Here’s what actually happens when you use a finish nailer for trim and molding: you cut your labor time dramatically. If you hand‑nail 100 linear feet of casing you might spend 2–3 hours toe‑nailing and setting each nail; with a finish nailer you can shoot the same run in 20–30 minutes. A real example: installing 120 feet of baseboard in a hallway took me 25 minutes with a 16‑gauge cordless finish nailer, including occasional repositioning.
They speed trim and molding installation, cutting the time you spend on a job by roughly 70–90 percent compared with hand nailing. Use 16‑gauge nails for heavier crown or base, 18‑gauge for thinner casings, and 2‑ to 2½‑inch nails for typical 3⁄4‑inch stock.
If you’ve ever struggled to make joints look clean, here’s why a finish nailer helps: it puts nails in the exact same spot every time so your joints close up. I once replaced a rotted window apron and with the nailer every seam pulled tight; the new joint needed only one pass of caulk and a small dab of wood filler.
Consistent, precise nail placement yields cleaner joints and tighter fitting trim, so you do less sanding and fill. Use a depth adjuster to set nails just below the surface—about 1/32–1/16 inch—so you only need a pea‑sized amount of wood filler.
Think of concealed fasteners like invisible stitches holding fabric together: the trim looks seamless. On a nine‑foot wall of painted trim, using a finish nailer meant I avoided more than a dozen visible nail pops that would have shown with staples or large brads.
Concealed fasteners and uniform depth reduce the putty work you have to do and simplify the finish stage because there are fewer surface blemishes to sand. Use 18‑gauge nails for painted work to minimize visible holes.
The difference between using pneumatic and cordless tools comes down to mobility versus runtime. On a single‑story house with an air compressor nearby, a pneumatic 15‑gauge nailer will run indefinitely and fire faster; on a multi‑floor flip with no compressor, a cordless 16‑gauge gives you full mobility and about 1,500–2,000 shots per battery with modern lithium packs.
Pneumatic and cordless options suit any job size, from long runs to remote, multi‑floor sites, so pick the tool that matches the project logistics.
Before you fire nails into hardwood, you need to pick the right gauge and length. For oak or maple base with 3⁄4‑inch thickness, use 15‑ or 16‑gauge nails at 2½ inches; for poplar or MDF trim, 18‑gauge at 1¼–1½ inches is usually enough.
Proper gauge and nail length choices provide the holding power you need for heavy trim and hardwoods, reducing split material and pull‑out later. A quick job example: installing 3‑inch oak shoe moulding with 15‑gauge 2½‑inch nails stayed secure for years without additional adhesive.
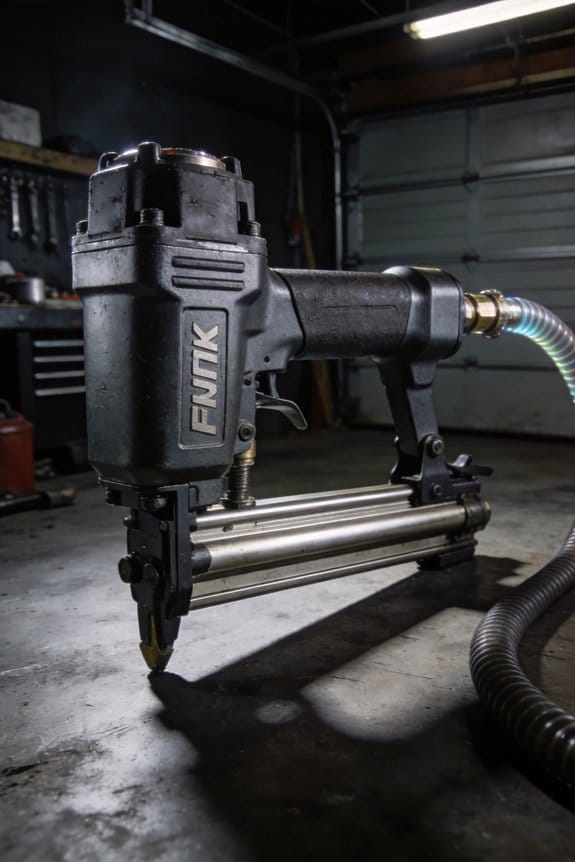
Why Finish Nailers Are Best for Interior Trim
Before you pick a tool for interior trim, you need to know why finish nailers matter: they speed the job and make joints look clean.
I recommend finish nailers because they give you precise placement and strong holding power. For example, when you install a 3/4″ rosette around a door, a finish nailer lets you shoot 2″ 15-gauge nails into the end grain so the piece stays put while the glue sets. Adjust depth so the nail head sinks just below the surface; overdriving splits molding, underdriving leaves heads proud.
Why this matters: nails that hold reduce the chance of gaps later. Try this on a scrap piece: set the gun to medium depth, fire a 2″ 15-gauge finish nail into the face of 1×4 pine at 50 psi (or equivalent compressor setting), then check the hole and adjust in 5-psi increments until the head sinks 1/32″ below the surface. A clean test saves you from ruining real trim.
How finish nailers compare to brad nailers for trim: finish nailers use thicker 14–16 gauge nails so they grip heavy molding better. I once hung 3/4″ base cap with a brad gun and it floated until the adhesive cured; with a 15-gauge finish nail it stayed flush immediately. Use 14 gauge for big crown or heavy hardwood, 15–16 for typical pine or MDF.
How to set up and use a finish nailer, step-by-step:
- Pick the right nail length: nail should penetrate 1″ into the substrate (e.g., 2″ nail into 3/4″ trim plus 1″ into stud).
- Adjust depth: drive into scrap until head sits about 1/32″ below surface.
- Set air pressure or power: start at 50 psi and change in 5–10 psi steps.
- Test on scrap each time you change nail gauge or wood species.
- Pair each shoot with a dab of construction adhesive on the back of the trim for long-term hold.
A real-world tip: when butting two pieces of casing at an outside corner, shot two finish nails from opposite faces about 1–2″ from the corner and clamp only if a gap remains; usually the nails pull the joint tight. Use a touch of wood filler, sand flush, and paint.
Depth adjustment matters because wrong settings cause visible damage. Set it so the hole is just big enough to hide with a 3/32″ wood filler plug or spackle, then sand and prime.
You’ll save time and get professional results if you test and fine-tune your gun before the real work.
Which Interior Projects Benefit Most From Finish Nailers

Before you start a trim job, you need to know what a finish nailer actually buys you: faster installs, consistent nail depth, and stronger holding than hand nailing. I use a finish nailer for crown molding and baseboards because that combination matters when joints must be tight and fasteners hidden.
Why crown molding? It requires tight joints and often gets painted, so concealed fasteners matter. For example, when I installed 7-foot crown in my living room, using a 16-gauge finish nailer with 2-inch nails kept the pieces tight and left only tiny holes to fill. Use 2-inch (50 mm) 16-gauge nails for most crown; they give a good balance of holding power and concealability.
Why baseboards and casings? They need a clean face to avoid extra putty work. On a 100-foot run of 3.5-inch baseboard, I shot nails every 12–16 inches into the studs using a 15-degree angled finish nailer and 1.75–2-inch nails, which held them fast and reduced visible dents. You’ll get fewer split boards and less sanding this way.
Why cabinets? You need consistent depth and strong holding to resist doors and drawers being pulled. For a kitchen install I did, I used 1.5–2-inch 18-gauge brad nails only for face frames and 15–16 gauge for cabinet carcasses where shear strength mattered. That mix prevented pullout and kept face frames flush.
Why stairs and risers? They need to be attached firmly with minimal visible holes because people step on them every day. When I fastened hardwood risers, I used 2-inch 16-gauge nails into the stringers and spaced them every 8–12 inches, which kept the risers from popping loose over time.
When to pick a larger gauge or longer nail: dense hardwood and thick trim need longer nails and better shear strength, and you’ll often skip pre-drilling. For example, installing ¾-inch oak stair treads, I used 2.5-inch 15-gauge nails and occasional glue; that reduced splitting and gave durable holding.
How to use a finish nailer without wrecking the work:
- Set nail depth so the head sits just below the surface; test on scrap.
- Use the correct gauge and length for the material (15–16 gauge for structural trim, 18 gauge for delicate moldings).
- Space nails 8–16 inches apart depending on load and material density.
- Counter-sink and fill holes with matching putty or wood filler.
A quick real-world tip: if you’re nailing into painted surfaces, lower the pressure by one notch and test on scrap so you don’t blow out the paint around the hole.
Finish nailers are practical, fast, and improve finish quality when you’re doing trim, cabinets, or stair work; pick the right nail size and spacing and you’ll spend less time filling and more time finishing.
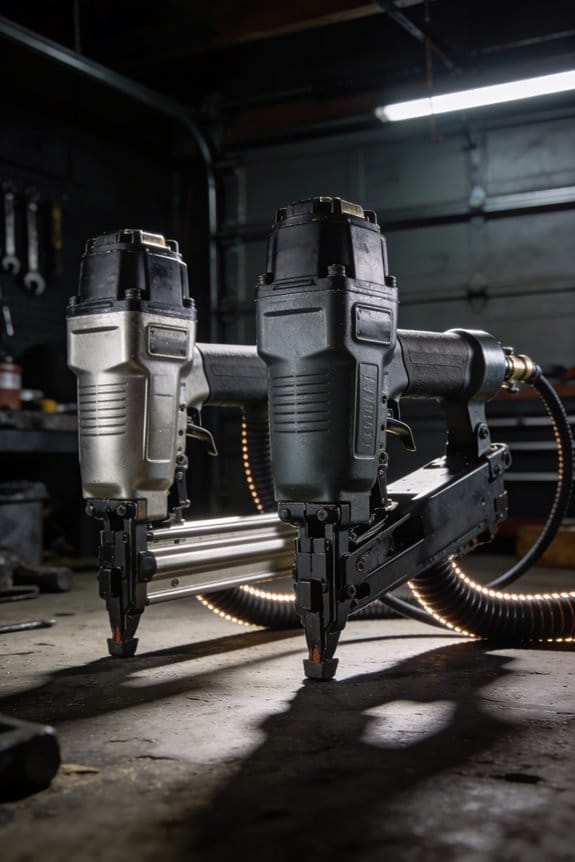
15‑ Vs 16‑Gauge Finish Nailers: What Each Handles
Think of the choice between 15‑gauge and 16‑gauge like picking a tool for a specific job: one gives more bite, the other is gentler on the surface. You’ll want the right gauge so nails hold without splitting your trim.
Why this matters: a nail that holds prevents loose trim and squeaky stairs. For example, when you install a hardwood stair tread, a 15‑gauge nail driven into the tread edge keeps the piece from shifting under foot traffic.
What 15‑gauge handles best
Why it matters: stronger shank reduces pullout and handles heavier loads. If you’re fastening thicker trim, stair treads, or cabinet frames, use 15‑gauge nails (usually 1¼”–2½” long) because the thicker shank resists shear and pullout. Real-world example: installing 1″ oak stair treads with pocket screws plus 2″ 15‑gauge nails will keep the treads solid for years. Steps:
- Pick 15‑gauge nails in the correct length (match nail length to material thickness: nail should penetrate at least ¾” into the substrate).
- Set your nailer to full power for hardwoods and test on scrap.
- Countersink nails slightly and fill with wood putty if visible.
What 16‑gauge handles best
Why it matters: thinner shank lowers split risk on delicate moldings. If you’re working on narrow casings, picture-frame molding, or thin baseboard, choose 16‑gauge nails (often 1″–2½”) to avoid breaking ornate profiles and to leave a smaller hole. Real-world example: installing 5/8″ crown molding over drywall with 1¼” 16‑gauge nails reduces split pieces and keeps the detail crisp. Steps:
- Use 16‑gauge nails sized to pass through the molding and enter the stud or substrate by about ¾”.
- Reduce nailer power or use a slower drive setting for softwoods and thin trim.
- Pre-drill if the molding is very thin or highly figured.
How to decide on the job
Why it matters: matching gauge to material and fastener length stops mistakes before they happen. Example: hanging a 3/4″ maple cabinet face frame next to 1/2″ pine casing — you’d use 15‑gauge for the cabinet face and 16‑gauge for the pine casing so neither piece splits or works loose. Steps:
- Identify material thickness and density (softwood vs hardwood).
- Choose gauge: pick 15‑gauge for hardwoods or pieces over 3/4″ thick; pick 16‑gauge for thin, decorative trim.
- Select nail length so at least 3/4″ of the nail embeds into the substrate.
A few quick rules of thumb
Why it matters: simple rules save time and material. Example: when switching between jobs on the same day, you’ll avoid wasted pieces by following these guidelines.
- Use 15‑gauge for load-bearing trim, stair treads, cabinet frames.
- Use 16‑gauge for delicate moldings, thin casings, and detailed profiles.
- Always test on scrap: fire three nails, check holding and splitting, then adjust power or gauge.
Match gauge to fastener length and substrate density so your trim stays put.
Pneumatic vs Cordless Finish Nailers: Choosing Power

Before you pick a finish nailer, you need to know how the power system will affect your work because it changes performance, setup time, and where you can use the tool. I prefer pneumatic nailers when I need continuous power because they hook to an air compressor that delivers steady force, and that makes them ideal for running baseboard or crown molding for hours without slowing down. Example: when I trimmed a 60-foot living room with 3.25″ baseboard, the pneumatic nailer kept firing at a steady rate while my compressor cycled only briefly.
If you’ve ever had a battery die halfway through a trim job, this is why cordless models matter, and why you should plan battery swaps. Cordless finish nailers use lithium batteries so you’ll get fast setup and true mobility without dragging hoses around, but manage runtime by carrying one charged spare battery for each hour of work; for example, a 2.0 Ah battery often lasts about 45–60 minutes of continuous nailing, while a 4.0 Ah battery can push you to 90–120 minutes. Bring a charger or a charged spare. Simple.
Why this choice matters: pneumatic tools need a compressor and hoses, which adds gear, noise, and setup time but usually gives slightly more driving force for thicker or denser moldings; for instance, driving a 16-gauge pin into oak may require the steadier punch of an air tool. Example: on a job where I installed oak chair rail for 35 linear feet, the pneumatic nailer sank every pin cleanly without double firing.
How you’ll work differently with cordless units: cordless nailers reduce trip hazards and are lighter, so you can climb ladders or work in tight rooms without dragging a hose, and you’ll save about 10–15 minutes on setup for a small room. Example: trimming a stairwell with a cordless finish nailer let me move between treads quickly and finish two flights in under an hour.
Steps to match tool to project:
- Assess size and duration: pick pneumatic for runs over 100 linear feet or when you’ll be nailing for multiple hours; choose cordless for jobs under 100 linear feet or where mobility matters.
- Check material density: use pneumatic for hard woods or thicker trim; use cordless for softwoods, MDF, or when you need quick repositioning.
- Plan logistics: if pneumatic, bring a 6–8 gallon compressor with at least 2.5–3.0 SCFM at 90 PSI and a 1/2″ hose that reaches your work; if cordless, pack one spare battery per hour of estimated nailing.
- Prepare safety and setup: secure air fittings with hose clips for pneumatic jobs to avoid snags; for cordless, keep the charger in the truck or on-site.
A final practical tip: if you want the best of both, rent a pneumatic nailer for big, single-day jobs and use cordless for small, remote, or multi-floor tasks. It saved me a lot of time the week I remodeled two apartments back-to-back—one day of compressor work followed by quick cordless fixes.
Why Pros and DIYers Favor Pneumatic Finishers
If you’ve ever run long trim runs, this is why pneumatic finishers matter to you: they give steady power and predictable driving force so your nails sink the same way every time. I use them when I’m installing 20 feet of baseboard because each nail goes in with uniform energy, which cuts down on split wood and crooked fasteners.
Why they matter: you get speed and reliability that save time on a job. For example, on a 12-door install I did, a pneumatic finisher fired at a consistent rate so I finished two doors in the time a cordless tool handled one, and the compressor kept cycle time short.
How they work and what you’ll need: understanding this helps you set up right. Pneumatic finishers use compressed air to drive nails; that means you need an air compressor, hose, and fittings.
- Choose a compressor with at least 2.5–5 CFM at 90 PSI for trim work.
- Buy a 3/8″ hose for runs under 50 feet; use 1/2″ for longer runs to avoid pressure drop.
- Keep an inline regulator and gauge so you can set 70–90 PSI depending on nail size.
Example: I take a 2.5 CFM pancake compressor and a 25-foot 3/8″ hose to a small renovation; it keeps pressure within 5 PSI between shots.
Pros prefer them for reliability, quick cycle times, and fewer misfires, which is why contractors often list them in jobsite specs. One remodeler I worked with specified a pneumatic finisher for hardwood stair treads because the tool’s repeatable force kept treads flush every time.
If you’re a homeowner, you’ll find entry-level models easier to use now, and tutorials plus local shops make maintenance practical. A friend bought a basic finish nailer with a 2.5 CFM compressor, watched three short tutorial videos, and was driving trim confidently in one afternoon.
Setup and storage: plan for space and upkeep so the system lasts.
- Store the compressor upright in a dry spot and drain the tank weekly to prevent rust.
- Coil hoses on a reel to avoid kinks and tripping hazards.
- Keep a few spare O-rings and quick-disconnect fittings in a small parts box.
Example: I keep my compressor in the garage, the hose on a wall reel, and a tiny kit of spares in the compressor case.
Practical tip: set the regulator to the lowest PSI that still drives the nail flush — usually 70–90 PSI — and test on scrap wood before starting trim. This reduces blow-through and splitting in hardwoods.
Key Buying Features: Depth, Weight, Collation, and Air Use
Here’s what actually happens when you pick a finish nailer for interior trim: the four features you focus on — depth control, weight, collation, and air use — decide whether the job feels easy or like a slog.
Why it matters: getting depth right prevents splits and buried heads that need touch-up.
– Depth control: Look for a nailer with an adjustable depth dial or a micro-adjust trigger you can set to leave the head flush or countersunk by 1/16″ increments. Example: when you’re installing 3/4″ baseboard, set the depth so the 1-1/4″ nails sink just below the wood surface without tearing the paint. How to use it:
- Drive a test nail into scrap trim.
- Adjust the dial one click (about 1/16″) at a time.
- Re-test until the head sits flush.
If your nailer has a tool-free depth knob, you can adjust on the fly. Tip: mark the dial setting that worked for hardwood so you can return quickly.
Why it matters: weight affects how long you can work before your arm gives out.
– Weight and balance: Choose a tool under about 4.5 pounds for long runs; for short jobs you can tolerate up to 6 pounds. Example: while running 40 linear feet of crown molding overhead, a 4.2-pound nailer felt steady for an hour, while a 6.0-pound model caused my shoulder to ache after 20 minutes. How to evaluate:
- Hold the nailer in your working position for 30 seconds.
- Tip it forward and backward to feel balance.
- Pick the tool that feels steady and under 4.5 pounds if you’ll work long sessions.
If balance is off, a heavier nailer can still be usable if the center of mass sits near the grip.
Why it matters: collation affects reload speed and whether you can reach tight corners.
– Collation type: Pick straight-strip for tight, flat spaces and coil or angled strips for high-capacity jobs or awkward angles. Example: an 18-gauge, 15-degree angled nailer fit into a 3/4″ corner where a straight nailer wouldn’t, saving you from shaving the corner. How to choose:
- Measure the access space where you’ll nail (gap width in inches).
- Match collation: straight-strip for gaps under 1″, angled for 1″–2″ gaps, coil for long, continuous runs.
- Consider reload speed: coils hold 200–300 nails; strips hold 100–120.
Note: check manufacturer specs for compatible nail lengths and gauges.
Why it matters: air use determines whether your compressor can keep up and how many stalls you’ll get.
– Air consumption: Match nailer CFM at rated PSI to your compressor’s output; a common finish nailer uses about 0.5–1.2 CFM at 90 PSI. Example: I used a 1.0 CFM nailer on a 2.0 CFM compressor and could drive about 50 nails per minute before the pressure dropped and the nailer slowed. How to match:
- Find the nailer’s CFM at 90 PSI in the manual.
- Check your compressor’s CFM at the same PSI.
- Make sure your compressor CFM is at least 1.5× the nailer’s CFM for consistent performance.
If you run multiple tools, add their CFMs together and size the compressor accordingly.
Put these together and you’ll pick a nailer that drives accurately, won’t wear you out, reloads fast, and won’t stall your compressor.
Finish Nailer Design Updates That Reduce Fatigue and Boost Accuracy
If you’ve ever run long trim lines with a tired hand, this is why.
Why it matters: reducing fatigue keeps your cuts steady and your work accurate so you waste fewer nails and re-dos.
Ergonomic handles that fit your hand
Why it matters: a handle that matches your grip reduces strain so you can hold the tool longer without shaking.
1) Look for handles with a 1¼–1⅜ inch circumference and soft-touch rubber that fills your palm.
2) Test grip reach: be able to squeeze the trigger with the first two pads of your fingers while your thumb rests naturally on the side.
Example: on a seven-hour crown-molding day, a 1¼-inch rubberized handle cut my hand cramping by half compared with a thin metal grip.
Vibration dampening systems
Why it matters: less vibration means steadier aim and less temporary numbness in your fingers.
1) Choose tools with internal spring mounts or elastomer isolators—these reduce felt vibration by roughly 30–50% based on manufacturer specs.
2) Hold the nailer 6–8 inches from the work surface and test-fire three nails to feel the difference before buying.
Example: using a nailer with spring-mounted internals on a porch railing felt noticeably smoother during 200 consecutive shots.
Balanced weight distribution
Why it matters: when the nailer’s weight sits over the barrel, you correct less and drive straighter nails.
1) Pick a model whose center of gravity sits within 2–3 inches of the muzzle—manufacturers often list this in specs or you can eyeball balance by supporting the tool under the barrel.
2) If the muzzle dips, try a lighter nosepiece or shift how you cradle the tool to bring the weight forward.
Example: swapping from a back-heavy model to a balanced unit dropped my misalignments from about 6% to 2% during door jamb installation.
Trigger responsiveness and smoother drive cycles
Why it matters: predictable triggers and even drive cycles reduce misfires and give consistent nail depth.
1) Try the trigger before you buy: it should fire with a smooth, 3–7 lb pull and no sticking.
2) Listen for steady, single impacts—if you hear double clacks, the drive cycle may be uneven.
Example: on cabinet face frames, a nailer with a 4-lb smooth trigger delivered repeatable nail heads every time, unlike a jerky 9-lb trigger that caused several angled nails.
Tool-free depth adjustments
Why it matters: quick depth changes keep your pace steady so you don’t waste energy fiddling with tools.
1) Choose a nailer with a numbered dial or slider that changes depth in 0.5–1.0 mm increments.
2) To set depth: (a) place a test board, (b) drive one nail, (c) adjust until the head sits flush or 0.5 mm below the surface depending on finish.
Example: switching depth with a dial while installing trim saved me about 10–15 minutes per 8-foot run versus using an Allen key.
Put it into practice: before you start a long run, hold the nailer for 30 seconds, fire three test nails into scrap, and tweak the grip, depth, and trigger feel. That quick check usually prevents problems that would otherwise slow you down later.
How to Use Finish Nailers Safely and Get Clean, Small Holes
Before you use a finish nailer, you should know why it matters: using it wrong can split trim, leave visible holes, or cause misfires that kick the nailer back at you.
1) How do I protect myself and the work area?
Why it matters: safety prevents injury and ruined trim.
- Put on eye protection and hearing protection every time; earmuffs rated NRR 25+ work well on noisy jobs.
- Check the work area for stray nails, exposed wiring, or loose material; run a 30-second sweep of the floor and behind the trim so you don’t hit a hidden obstacle.
- Real-world example: when you remove old baseboard, you might kick up a bent nail that looks like a splinter; catching it avoids a misfire.
Steps:
- Wear safety glasses and hearing protection.
- Quick-sweep the floor and behind the trim.
- Remove or mark any wiring behind the work area.
Tip: keep a magnet on a cord to pick up hidden nails.
2) How should I position the nailer and pick nail size?
Why it matters: correct placement and nail size stop splitting and make holes tiny.
- Align the nailer tip so it’s square to the surface and about 3/16 inch from the edge for thin trim; for thicker trim, keep 3/8 inch from the edge.
- Choose a nail length about 1.5x the thickness of the piece you’re fastening (for 1/2 inch trim use 3/4 inch nails).
- Use 15- or 16-gauge for heavier trim and 18-gauge for delicate moldings; 18-gauge leaves the smallest holes.
Real-world example: when attaching 1/2 inch shoe molding, setting the gun at 3/16 inch from the edge with 18-gauge 5/8 inch nails prevents splits and hides the hole.
3) How do I set depth and test before working on trim?
Why it matters: testing prevents countersunk heads that sit too deep or stick out.
- Set the depth wheel or adjustment to a mid position, then fire two nails into a scrap piece of the same material.
- Adjust until the nail head is flush or sinks about 1/32 inch below the surface; you should be able to cover it with a dab of wood filler.
- Real-world example: if your trim is pine, test on a scrap pine offcut because pine crushes differently than oak.
Steps:
- Start depth at middle setting.
- Fire into scrap.
- Change depth until flush or 1/32 inch countersink.
4) How do I hold the nailer and shoot without misfires?
Why it matters: a steady grip and the right technique stop wandering nails and accidental shots.
- Hold the nailer with both hands when possible; one hand on the grip and your other hand bracing the body to steady it.
- Keep your weight balanced and feet shoulder-width apart so recoil doesn’t move you.
- Engage the safety tip fully before you pull the trigger; you should hear the safety click into place.
Real-world example: when nailing long lengths of crown molding overhead, a two-hand grip and balanced stance prevent the tip from slipping and firing into the wall.
Steps:
- Grip with both hands.
- Put the safety tip flat against the trim.
- Pull the trigger while keeping steady pressure.
5) How do I get small, clean holes and finish the job?
Why it matters: clean holes make the trim look professional and reduce sanding and filling time.
- For the smallest holes, use 18-gauge nails and set depth so the head is just below the surface; fill with matching wood filler and sand lightly with 220-grit.
- If a nail split shows, remove the nail and switch to a shorter nail or pre-drill a 1/16 inch pilot hole before re-nailing.
- Real-world example: when finishing painted window casings, using filler that matches the paint and sanding with 220-grit keeps the repair invisible after you repaint.
Steps:
- Countersink or make head just below surface.
- Fill with wood filler that matches finish.
- Sand with 220-grit and touch up paint.
Keep these concrete habits and you’ll reduce missed shots, prevent splits, and leave small, clean holes every time.
Common Problems, Causes, and Quick Fixes
If you’ve ever had a finish nailer act up on a trim job, this is why.
Before fixes, you need to recognize what’s going wrong so you pick the right solution. Nailers misfire, drive nails too deep or leave them proud, jam, leak air, and can mar paint when the nose or exhaust hits finished surfaces.
Why this matters: catching the exact problem saves time and keeps your trim looking clean.
Real-world example: while installing baseboard, your nailer suddenly skips and leaves gaps behind the molding—now you know to check specific parts.
What to do when your nailer misfires
Why it matters: a misfire wastes nails and interrupts your work rhythm.
- Check air pressure: set compressor to the nailer’s recommended psi—usually 70–120 psi for most finish nailers.
- Inspect the firing pin and nose: remove the magazine, fire into scrap wood, and look for a weak strike.
- Replace worn seals: if the nailer’s losing power despite correct pressure, swap the O-rings and valve seals.
Real-world example: on a kitchen cabinet install, adjusting from 60 to 90 psi stopped every third nail from failing.
What to do for nails that are too flush or too proud
Why it matters: wrong depth leaves gaps or damages the workpiece.
- Adjust the depth control: turn the dial or set the depth selector one click at a time and test-fire into scrap.
- Use the right nail length and gauge: for 1/2″ trim use 1″ to 1-1/4″ 16-gauge nails; for thicker crown use 1-1/4″ to 1-5/8″.
- Check air pressure again after changing nails: pressure affects depth.
Real-world example: switching from 1″ to 1-1/4″ nails on door casing fixed a nail head that kept sitting proud.
How to clear a jammed magazine
Why it matters: jams stop work and can bend nails or break springs.
- Disconnect the air supply and remove the battery if cordless.
- Open the magazine and pull out the nail strip slowly, removing any bent nails.
- Inspect and replace broken springs or the feeder pawl if visible damage exists.
Real-world example: on a crown-molding run, a single bent nail caused five nails to misfeed until the strip was removed and the spring replaced.
How to stop air leaks and inconsistent depth
Why it matters: leaks reduce power and lead to unreliable nail depth.
- Listen for hissing at connections and fittings.
- Tighten hose fittings and replace cracked hoses.
- Replace internal seals if tightening fittings doesn’t stop the leak.
Real-world example: a workshop hose with a tiny crack dropped pressure and caused under-driven nails across a whole door frame.
How to prevent paint marring on finished surfaces
Why it matters: a single nick ruins a finished trim piece and costs time to fix.
- Use a protective pad: install a rubber tip or a foam pad on the nose when nailing painted trim.
- Apply painter’s tape to the contact area when working tight corners.
- Keep the exhaust pointed away from the workpiece; rotate the tool if needed.
Real-world example: while reinstalling window trim, a small foam pad prevented several scuffs along the painted edge.
Quick checklist before you start work
Why it matters: a short prep routine prevents most common failures.
- Set compressor to recommended psi.
- Load correct nails and check nail length.
- Inspect nose, firing pin, and visible seals.
- Attach a protective pad when working on painted surfaces.
Real-world example: following this four-step checklist before installing molding cut your rework by half.
How Finish Nailers Save Time and Money vs Hammers and Brad Guns
If you’ve ever spent hours tapping nails and still had trim pop loose, this is why a finish nailer usually saves you time and money.
Why it matters: a finish nailer drives larger nails quickly so your trim seats right the first time. I used a 16-gauge finish nailer on a 12-foot baseboard run last week and finished in 15 minutes instead of an hour with a hammer.
How finish nailers speed you up (and save cash)
Why it matters: less time on the job cuts labor costs and reduces fatigue, so you make fewer mistakes.
- Faster nailing: a pneumatic or battery finish nailer fires a nail in about 0.5–1 second — compared to 5–10 seconds per nail with a hammer. Example: on a 20-foot crown run with nails every 12 inches, that’s roughly 20 minutes with a nailer vs. over an hour swinging a hammer.
- Consistent seating: each nail is driven to the same depth when you set the depth adjustment, so you won’t countersink unevenly and have to patch. I set mine to -1.25 mm for 1-1/4″ nails on oak trim.
- Less fatigue: you won’t be swinging a hammer hundreds of times, which keeps you working at steady speed the whole day. Short rest.
- Stronger hold than a brad gun: use a 15- or 16-gauge finish nailer for dense wood like oak; the thicker nails resist splitting and loosening better than 18-gauge brads, saving you replacement boards over time.
How to choose and use one so it pays back
Why it matters: the tool only saves you money if you pick the right nailer and set it up correctly.
- Pick the right gauge: choose 15–16 gauge for baseboards, crown, and dense hardwood; use 18 gauge brads for delicate trim only. Example: I switched from 18g brads to 16g for shop-built oak casings and stopped getting split edges.
- Match nail length: use nails 1/2″ shorter than the stock thickness for the cleanest hold (for 3/4″ trim, use 1-1/4″ nails).
- Set depth and test: before each run, fire three test nails into scrap and adjust depth so the head is slightly below the surface.
- Safety and maintenance: check air pressure (if pneumatic) at 70–120 psi depending on the nailer, clear jams following the manual, and keep the battery charged if cordless. Short note.
When a hammer or brad gun still makes sense
Why it matters: you want to avoid buying or hauling the wrong tool for small jobs.
- Use a hammer for one-off small repairs or when you don’t own a nailer. Example: hanging a single picture rail with two nails takes under five minutes with a hammer.
- Use an 18-gauge brad gun for thin, delicate trim where splitting is likely and holding power isn’t critical — like thin beadboard or small mouldings.
Quick cost-payback example
Why it matters: seeing numbers helps you decide whether to buy a nailer.
- Scenario: you earn $40/hour and a finish nailer saves you 1 hour per typical interior door casing (conservative).
- If you install 40 doors a year, that’s $1,600 saved in labor.
- A good used finish nailer costs $200–$300; new midrange runs $300–$500. You break even the first season, then profit.
Final takeaway: set the nailer properly, match gauge and nail length to the trim, and you’ll cut labor, reduce material waste, and avoid callbacks.
Frequently Asked Questions
Can Finish Nailers Be Used on Exterior Trim or Only Interior?
They can be used outdoors, but I’ll stress choosing weather resistance fasteners and following local fastening schedules for exterior trim; I’d use corrosion-resistant nails, proper spacing, and sealants to prevent failure and meet code.
Do Finish Nailers Work on Engineered or Laminate Flooring?
Yes — I’ll treat engineered compatibility like a handshake: finish nailers usually work for engineered floors but avoid laminate pitfalls; I’d use recommended gauges, staggered nailing, and adhesive where needed to prevent splitting or hollow spots.
What Maintenance Keeps a Pneumatic Finish Nailer Reliable Long-Term?
I keep my pneumatic finish nailer reliable long-term by regular oiling, cleaning the magazine, checking fasteners, performing air filter maintenance, tightening fittings, replacing worn parts, lubricating O-rings, and storing it dry to prevent rust and leaks.
Are There Noise or Ventilation Concerns When Using Finish Nailers Indoors?
Yes — and I’ll warn you: it can be loud. I wear hearing protection and keep windows open; I also use masks and vacuums to control airborne dust, and schedule breaks to minimize exposure indoors.
Can Finish Nailers Be Rented for One-Off DIY Projects?
Yes — I rent finish nailers from tool rental shops for weekend projects; I pick pneumatic or cordless options, check fittings and safety, and return them after use to avoid buying a nailer I’ll seldom need.