You’re watching a tech roll a compressor into the shop and wonder if that old tank can still be trusted.
You ask yourself, “What happens if this receiver fails under higher pressure — will it send metal and tools flying?” Most people assume older equipment is safe if it looks intact, or they only worry about leaks, not the stored explosive energy in larger, higher‑pressure systems.
This article will show you the practical checks and simple procedures that prevent catastrophic failures, reduce wasted energy, and cut maintenance costs.
You’ll get a clear checklist for inspections, bleeding, and lockout steps, plus priorities for repairs and upgrades.
It’s easier than it sounds.
Key Takeaways
If you’ve ever stood near an old air tank and felt uneasy, this is why.
Larger receivers and higher pressures matter because they store a lot more energy and that energy can be released instantly. A 120-gallon tank at 150 psi holds roughly three times the energy of a 30-gallon tank at the same pressure, so a ruptured fitting can throw metal fragments dozens of feet. Example: a 2019 shop accident sent a flange across a parking lot after a fitting failed.
Before I tell you how to reduce the risk, know this: higher stored energy can shoot shrapnel and cause serious injuries in a fraction of a second. Replace brittle fittings on any receiver over 100 psi; use rated, stamped parts and inspect them every month.
Think of fault cascades like a row of dominoes, where a small leak or a stuck valve overloads another component, and failures multiply fast. A stuck unloader can let pressure build beyond a regulator’s limit, then blow a hose. Example: in one shop a stuck valve led to a compressor trip that overpressurized a downstream tool, splitting its coupling.
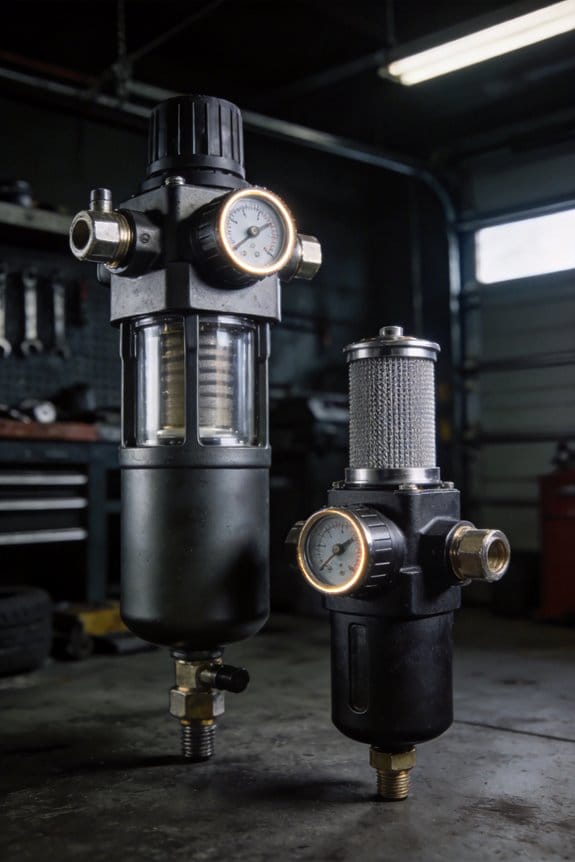
Why you should act: moisture and oil contaminate pipes and tools, accelerating wear and spreading damage downstream. Drain your tank daily and install a water separator with a 5-micron filter; visually check the separator bowl each week.
Before you set up a new system, remember regulators, relief valves, and containment need to match the pressure and volume. If relief capacity is too small, pressure spikes won’t be relieved fast enough. Example: swapping a 1/4-inch relief for a 3/8-inch model dropped discharge time from 3 seconds to under 1 second during a test.
How to make your system safer — follow these steps:
- Calculate stored energy: multiply tank volume (gallons) by pressure (psi) to get a comparative figure, then compare against your previous setup.
- Replace suspect hardware: use stamped, rated fittings and hoses rated at 1.5× your working pressure.
- Install protection: fit a properly sized relief valve and a pressure switch set below maximum allowable working pressure.
- Maintain routinely: drain tanks daily, inspect fittings monthly, and perform a pressure test annually.
- Monitor contaminants: add a 5-micron filter and change elements every 3–6 months depending on use.
Regulatory pressure is increasing because agencies now require registration and periodic testing once systems exceed certain sizes or pressures. If your receiver is over 120 gallons or you routinely run above 150 psi, expect inspections and documentation. Example: a small fabrication shop had to register its 150-gallon system after a county audit and then passed only after updating relief valves.
Final actionable tip: mark every component with its maximum pressure and replace anything with unknown ratings. A stamped fitting gives you certainty; guessing costs you safety.
Why Compressed‑Air Risks Are Rising
If you’ve ever watched a compressor motor stall and heard valves sputter, this is why.
Why it matters: failures can injure people and shut your shop for days. Compressed‑air systems often look simple, but you need to treat them like pressure systems with moving parts.
1) Systems are getting bigger and meaner.
Why it matters: higher pressure and larger tanks store more energy, so failures are worse.
Example: a 200‑litre receiver at 10 bar holds roughly 20 kWh of energy — enough to launch shrapnel if a fitting blows.
How to handle it:
- Keep operating pressure at the minimum you need; drop 1–2 bar and you’ll cut energy stored significantly.
- Fit a pressure relief valve sized to the receiver and test it every 6 months.
- Inspect welds and fittings visually every month and do a dye‑penetrant test yearly on suspect tanks.
2) Small faults can cascade quickly.
Why it matters: one stuck valve or a bad regulator can overload other parts and cause multiple failures.
Example: a leaking unloader lets the motor run longer, heating oil and killing seals in the compressor head within weeks.
How to handle it:
- Install pressure gauges at key points (compressor outlet, after dryer, main distribution) so you can see drops instantly.
- Replace valves or regulators that deviate by more than 10% from setpoint.
- Put a simple log sheet on the compressor and note any unusual cycles daily for two weeks after repairs.
3) Maintenance gaps let leaks and contamination spread.
Why it matters: leaks waste energy and contamination accelerates wear, making the whole system unreliable.
Example: a torn hose near a grinder sprays oil‑laden air into a branch line and fouls downstream pneumatic tools in days.
How to handle it:
- Perform a leak audit quarterly: spray soapy water on joints and listen/feel for hissing; tag and replace leaks that lose more than 0.5 L/min.
- Change compressor oil and filters at manufacturer intervals — for many small rotary screws, that’s ~500–1000 operating hours.
- Fit particle and coalescing filters before sensitive tools, and check pressure drop across them monthly.
4) Environmental exposure speeds wear.
Why it matters: dust, moisture, and corrosive air shorten component life and increase failure odds.
Example: a shop that sweeps metal dust without a booth accumulates grit in dryers and check valves, causing them to stick within months.
How to handle it:
- Install a refrigerated dryer if ambient moisture causes condensate at the end of your line; it can cut dew point from +10°C to around +3°C.
- Use a desiccant dryer when you need dew points below −20°C for painting or instrumentation.
- Keep intakes clear and elevated; a simple pre‑filter at the intake cut replacement frequency in my friend’s shop from monthly to every six months.
5) Older units are being pushed harder by regulations and energy targets.
Why it matters: running old compressors at higher loads without planned upkeep raises downtime and safety risks.
Example: an eight‑year‑old compressor in a busy shop ran 20% above its rated duty cycle and failed a crankshaft, halting production for three days.
How to handle it:
- Do a load profile: record run time and pressure cycles for two weeks to see actual duty; compare to the compressor’s rated duty cycle.
- If average load exceeds 80% of rated duty, plan either staged capacity (add a trim unit) or schedule a rebuild within 6–12 months.
- Keep a simple spare parts kit: common belts, gaskets, and a pre‑set relief valve can get you running faster.
Final practical checklist you can use today:
- Measure receiver size and operating pressure; note stored energy (kWh) for safety planning.
- Put gauges at three points: compressor outlet, after treatment, and at the far end of the longest branch.
- Do a quarterly leak audit and log repairs.
- Track run hours and pressure cycles for two weeks to see actual duty.
- Stock a small parts kit and schedule relief valve and tank inspections annually.
If you follow these steps, you’ll reduce surprise failures, save energy, and keep your team safer.
How Catastrophic Compressor Failures Happen : And Warning Signs
If you’ve ever watched a machine go from humming to dead in minutes, this is why.
Why this matters: catching early signs saves you days of downtime and thousands in repairs.
How catastrophic compressor failures start and what to watch for
1) Blocked intake and dust implosion
- Why it matters: a blocked intake can suddenly collapse housings, creating immediate mechanical failure.
- What happens: dust builds up in the intake or baghouse until a shock — like a sudden blast of air or a surge in flow — causes a dust implosion that can bend or crack headers and housings.
- Real-world example: on a cement plant line, a clogged baghouse flange let fine powder pile up; a surge from a startup blew the dust inward and split a header weld, stopping production for three days.
- How to prevent it (steps):
- Inspect intakes and baghouses weekly during dusty operations.
- Replace or clean filters when pressure drop across the filter rises by 6–8 in. H2O.
- Install a differential pressure gauge with a visible alarm set at the manufacturer’s limit.
– Key detail: record the filter differential every shift.
2) Seal fatigue and leak escalation
- Why it matters: a small seal leak creates heat and vibration that accelerate wear and lead to bigger failures.
- What happens: seals age or get nicked, letting oil or compressed air escape; that leakage raises local temperatures and vibration, which then damages bearings and shafts.
- Real-world example: a plant operator ignored a slow oil drip for a week; the shaft seal failure led to bearing overheating and a shaft fracture within two days.
- How to prevent it (steps):
- Check seals each month during routine lubrication rounds.
- Replace seals that show hardening, cracking, or oil film beyond 1 cm from the gland.
- Use a thermal gun to check for temperature rises greater than 10°C over the adjacent housing.
– Key detail: keep a log of seal part numbers and replacement dates.
3) Pressure spikes, odd noises, and heat rises
- Why it matters: pressure and temperature aberrations are direct precursors to catastrophic mechanical stress.
- What happens: sudden pressure spikes or compressor surges stress valves and piping; unusual rattles or whines often mean internal component failure; steady temperature climbs mean lubrication or cooling issues.
- Real-world example: a food-processing facility heard a rhythmic ping and saw discharge pressure jump during a batch; a broken reed valve was the cause and cost two days of emergency repair.
- How to prevent it (steps):
- Fit pressure transducers and set alarms at 10% above normal operating pressure.
- Listen monthly for rhythm changes; mark any new, repeated sounds and timestamp them.
- Track discharge temperature every hour during runs; flag increases over 5°C within an 8-hour shift.
– Key detail: attach microphone sensors near the casing if you run 24/7.
4) Oil contamination and erratic gauges
- Why it matters: contaminated oil kills bearings and makes gauges lie to you, hiding real problems.
- What happens: water, dust, or metal particles in oil reduce lubrication and cause scoring; gauges that jump around can indicate sensor failure or real pressure fluctuations that you must address.
- Real-world example: a sugar refinery had brown, gritty oil; filters showed metal shavings and the main bearing failed within three days.
- How to prevent it (steps):
- Sample oil monthly and send it for particle count and water content; replace oil if contamination exceeds ISO 18/16/13.
- Change oil filters every 500–1,000 operating hours or per OEM guidance.
- Calibrate gauges annually and replace any that drift more than 3% from a reference standard.
– Key detail: keep a spare gauge and filter kit on-site.
Routine inspections that actually work
Why it matters: scheduled, consistent checks catch small faults before they cascade into failures.
- Real-world example: a compressor shop saved a weekend by catching a 0.2 mm shaft misalignment during a quarterly check and correcting it before a coupling failed.
- Steps:
- Weekly: visual intake/filter check, oil level, and listen for new noises.
- Monthly: seal inspection, vibration scan, oil sample.
- Quarterly: full alignment check, filter element replacement, gauge calibration.
- Annually: teardown inspection per OEM checklist.
– Key detail: use a checklist and sign-offs so you can track trends.
Act immediately on early indicators
Why it matters: fast action turns a small repair into routine maintenance instead of a catastrophic job.
– What to do (steps):
- If you see a rising differential across filters, stop, clean or replace filters, and reset alarms.
- If you detect oil contamination, shut down, sample the oil, and inspect bearings within 24 hours.
- If you hear a new rhythmic noise or see pressure spikes, reduce load and run vibration capture; plan a stop within the next shift.
- Real-world example: reducing load on hearing weird knocks let an operator limp a compressor to a scheduled outage instead of an emergency tear-down.
- Key detail: always have a basic emergency kit (spare seals, filters, a gauge, and hand tools) on site.
Final practical tips
- Carry a vibration meter and thermal gun in the control room.
- Track three numbers daily: intake differential (in. H2O), discharge temp (°C), and oil particle count when sampled.
- Train one person each shift to be responsible for the checklist and log.
Follow these steps and you’ll catch most problems before they become catastrophic.
Hidden Costs: Downtime, Leaks, and Wasted Energy

If you’ve ever lost production to a surprise repair, this is why.
Why it matters: downtime stops work, raises labor costs, and scrambles inventory so you can’t find parts when you need them. Last month I watched a shop shut a line for six hours because a compressor failed; the crew hunted three different cabinets before finding a gasket. Fix: keep a simple parts log with exact part numbers and at least two spares for critical items.
Here’s what actually happens when leaks drain your compressor.
Why it matters: leaks reduce system pressure, so tools cycle slower and wear out faster. I once found a 3/8″ hose split under a bench that leaked 40% of the system’s output; drills ran half a minute longer each cycle. Steps to fix:
- Walk the plant with a $20 ultrasonic leak detector or a spray bottle of soapy water. Mark each leak.
- Prioritize leaks leaking more than 5 SCFM (standard cubic feet per minute) — those cost real money.
- Replace or clamp leaks within 48 hours and recheck.
Before you skip energy audits, remember wasted power shows up on your bill.
Why it matters: wasted energy adds direct cost and masks other problems, so audits pay back fast. A one-hour energy audit can reveal leaks and control issues that cut power use by 10–30%. Example: a medium shop cut its compressor run time by two hours daily after installing a timed unload control, saving roughly $1,200 a year. Steps:
- Read your electric meter each hour for three days and log run times.
- Compare compressor load vs. production schedule to find idle running.
- Install timers or pressure band controls if idle run exceeds 10% of paid hours.
The difference between safe operations and higher error rates comes down to consistent pressure.
Why it matters: uneven pressure makes operators compensate, which raises fatigue and mistakes. I saw an assembly bench that lost 7 psi across a run; workers had to hold tools longer and made more alignment errors during the afternoon shift. Practical fixes:
- Measure pressure at the farthest tool with a gauge weekly.
- Keep pressure drop under 5 psi for pneumatic tools; raise system size or add a booster for long runs.
- Train operators to record low-pressure events on a one-line log.
Practical maintenance steps that actually cut costs.
Why it matters: regular maintenance reduces unscheduled downtime and energy waste. Example: a small shop avoided a $4,000 overhead rebuild by replacing a $80 intake filter and changing oil monthly. Do this:
- Create a simple checklist with weekly, monthly, and annual tasks.
- Weekly: check belts, drains, and receiver pressure; empty condensate traps.
- Monthly: replace air filters and inspect hoses for cracks.
- Annually: service the compressor per the manufacturer’s hours and keep records for two years.
End takeaway: hunt leaks, log parts, check pressure at the tool, and run scheduled maintenance — each action saves time and money.
Regulatory Essentials for Pressure Vessels and Compressors
Before you start working around compressors and pressure vessels, you need to know the rules that keep people safe and plants running.
Why this matters: following the right rules prevents injuries and keeps your plant online. For example, a small food-plant compressor failing mid-shift stopped production for two days and cost $60,000 in lost product.
1) What inspections do you need and why they matter
Why this matters: regular inspections catch wear before it becomes a shutdown.
Steps:
- Follow AS/NZS inspection schedules: inspect low-hazard vessels every 12 months and high-hazard or large vessels every 6 months.
- Use the prescribed methods: visual, pressure testing, and non-destructive testing (NDT) like dye-penetrant or ultrasonic per the standard.
- Log each inspection with date, inspector name, findings, and corrective actions.
Real-world example: a municipal water utility found a hairline crack during a 6-month ultrasonic check and avoided a burst that would have flooded the pump room.
2) Do you have to register high-capacity receivers?
Why this matters: registration links equipment to legal oversight and accountability.
Steps:
- If your receiver capacity exceeds your state’s threshold (often 1000 L for compressed air — check your state WorkSafe), submit a registration form and the vessel ID.
- Keep the registration certificate on site and renew or update it within 30 days of major modifications.
Real-world example: a workshop added a 1,200 L receiver and registered it with WorkSafe; an inspector verified the registration and saved the owner from a $5,000 fine during routine checks.
3) What about efficiency and certification rules?
Why this matters: compliance can cut energy costs and avoid penalties.
Steps:
- Check DOE or local minimum-efficiency rules for new compressors; many jurisdictions now require a specific MEPS rating.
- For sectors needing oil-free air, require ISO 8573-1 oil-free certification and keep the certificate with purchase documents.
Real-world example: a food-packaging line switched to an ISO-certified oil-free compressor and reduced product rejects caused by oil contamination.
4) How should you maintain records and test results?
Why this matters: auditors verify fitness-for-service from your paperwork.
Steps:
- Keep a bound or electronic log for at least the statutory period (commonly 5 years).
- Store certificates, test reports, inspection logs, repair invoices, and pressure-test results together and label them by vessel ID.
- Make backups: scan documents and keep a copy offsite or in the cloud.
Real-world example: during an insurance claim after a rupture, a factory provided five years of inspection records and got a favorable settlement within 30 days.
5) What practical effects will this have for you?
Why this matters: following basics reduces legal risk and downtime.
Steps:
- Schedule inspections on a calendar with reminders at 1 month and 1 week before due dates.
- Assign a single person to own registration and records so nothing slips through the cracks.
- Budget 1–3% of equipment value annually for inspection, testing, and minor repairs.
Real-world example: a small plant that set calendar reminders and assigned ownership cut emergency repairs by 70% over a year.
Final fact: keep inspection intervals, registration paperwork, efficiency certificates, and five years of records together by vessel ID so an auditor can verify compliance in under one hour.
Immediate Controls: Inspections and Stopgaps You Can Do Today

Before you start, know this matters because small leaks and bad gauges can cause injuries or shutdowns fast.
1) What should you look for on hoses and fittings?
Why it matters: a failing hose can burst under pressure and throw shrapnel or release stored air.
Steps:
- Visually scan every hose for cuts, bulges, kinks, or oil stains; use a bright flashlight and inspect at the fittings where most failures start.
- Run your hand (wearing gloves) along the hose to feel for soft spots or swelling — those are signs of internal deterioration.
- Replace hoses showing any damage with hoses rated at least 1.5× the system pressure; for example, if your system runs at 100 psi, use hoses rated 150 psi or higher.
Real-world example: I once found a hose with a 2-inch oil streak near a coupling on a 90 psi line; it failed within a week during a busy shift.
If a gauge or safety valve reads wrong, how do you check them?
Why it matters: inaccurate instruments hide hazards and can let pressure exceed safe limits.
Steps:
- Compare each gauge to a calibrated reference gauge, reading at the same time while the compressor runs; acceptable variance is ±3% for industrial gauges.
- Test safety valves by slowly increasing pressure to just above the valve setpoint and confirm they lift cleanly; keep a shield in place while doing this.
- Tag and take out any gauge or valve that fails and replace it within 24 hours.
Real-world example: A compressor had a fouled gauge reading 10 psi low; an operator tightened a fitting based on that false reading and overloaded downstream equipment.
How do you make sure work on the compressor is safe?
Why it matters: stored energy can restart the machine or discharge suddenly, causing harm.
Steps:
- Follow lockout-tagout: turn off power at the main breaker, lock the breaker with your padlock, and attach a tag with your name and date.
- Bleed stored air by opening the tank drain and any downstream isolation valves until pressure reads 0 psi on a verified gauge.
- Verify zero energy: try restarting controls; they must not respond before you begin work.
Real-world example: On one job, we locked out electrical power but forgot to drain a downstream trap and it expelled a blast of compressed air when we opened a fitting.
What temporary isolation methods should you use during repairs?
Why it matters: isolating a section prevents pressure from entering the repair area and keeps other systems running.
Steps:
- Use a blind flange or two locked valves in series to isolate the section; if using valves, place a physical lock on each and tag them.
- Install a pressure gauge or test point on the isolated side to confirm it stays at 0 psi during repair.
- If you must, use a high-quality repair clamp sized to the pipe diameter as a short-term fix; label the clamp with the repair date.
Real-world example: We isolated a leaking branch line on a plant floor with a blind flange and kept the rest of the system online, avoiding a production stop.
How do you document and follow up?
Why it matters: logging keeps repairs from being forgotten and tracks recurring issues.
Steps:
- Record what you found, the temporary fixes applied, who did the work, and the deadline for permanent repair.
- Set the permanent repair within 7 days for safety items or immediately if the part is critical to operation.
- Keep the log near the equipment and enter the same data into your maintenance system.
Real-world example: A clamp labeled with a repair date and due date prompted a scheduled shutdown the following week, where the technician replaced the pipe before a failure.
Final practical tips:
- Wear safety glasses, gloves, and hearing protection every time.
- Keep a calibrated reference gauge and a set of rated hoses on hand.
- If anything is unclear, stop and call a certified technician.
Takeaway: inspect, lockout, isolate, log — and replace within the week.
Preventive Maintenance: Safety Gains and ROI
If you’ve ever walked into a shop and smelled oil or heard a compressor struggling, this is why.
Why it matters: scheduled preventive maintenance keeps your compressors running safely and stops surprise shutdowns that cost you hours and money.
1) What exactly you should do and why it helps
– Step 1: Inspect wear points every 500 operating hours or every 3 months, whichever comes first. Check belts, couplings, and vibration mounts; worn belts can slip and cause overheating.
Example: I saw a small auto shop where a cracked belt shredded after 700 hours and shut production for four hours while they waited for a part.
– Step 2: Clean or replace air filters and baghouse cartridges every 1,000 hours or when pressure drop across the filter exceeds 10 psi. Dirty filters make compressors work 10–20% harder.
Example: A local fabricator reduced energy use by 12% after replacing clogged filters they’d ignored for a year.
– Step 3: Replace seals and gaskets on a 12-month schedule, or sooner if you see oil leaks. Leaks raise the risk of fire and drop system pressure.
Example: A plant found a failing seal that produced visible oil spray; replacing it stopped an intermittent pressure loss that had delayed jobs.
– Step 4: Monitor piping and headers visually every month and pressure-test annually to 1.5× working pressure. Scheduled checks catch stress fractures before they rupture.
Example: A manufacturer caught a hairline crack during a pressure test and avoided a dangerous blowout during peak production.
Why this saves money: fixing small issues on a schedule costs a fraction of emergency repairs and prevents lost production time.
2) How to set up a simple, reliable system
Why it matters: without a routine, parts run out and service gets delayed, which is when failures happen.
Steps:
- Keep a maintenance log (paper or simple spreadsheet) with date, hours, work done, and parts used.
- Link that log to an inventory list of critical spares: belts, seals, filters, common fittings. Keep minimums: 2 belts, 4 filter cartridges, 3 seal kits.
- Set calendar reminders at the intervals above and tag tasks as “safety critical” so they can’t be postponed.
- Train one person to own the log and sign off each job.
Example: A woodworking shop assigned one tech to the log, kept two spare belts on a hook, and cut emergency downtime from 6 hours to 45 minutes by swapping a part on the spot.
Why the ROI shows up quickly: you’ll see fewer unplanned stoppages, lower energy bills, and smaller repair invoices.
3) Energy and safety checks that pay for themselves
Why it matters: leaks and clogged filters increase energy use and raise the chance of failures.
– Do a leak audit twice a year; use soapy water or an ultrasonic detector to find leaks, then fix them within two weeks. Fixing leaks often reduces energy use by 5–15%.
Example: A small brewery fixed three header leaks and dropped compressor run-time by 10%, cutting their electric bill noticeably the next month.
– Track operating pressure and airflow weekly; if pressure drifts more than 3 psi or airflow drops 5%, investigate immediately.
Example: Weekly charts at a machine shop showed a steady 6% airflow loss tied to a loose flange; tightening it restored capacity.
Final practical note: start small — pick one compressor, follow the inspection intervals above for three months, keep the spare parts list updated, and you’ll have a repeatable routine that pays off.
Compressed‑Air Checks and Upgrades to Improve Safety and Efficiency
Before you swap parts, understand why cleaner air matters: it protects tools and stops internal corrosion that causes failures.
1) Upgrade your filters — why it matters: dirty filters let particulates and oil reach tools and piping, shortening life and causing leaks. Example: a machine shop in Ohio replaced 10-year-old elements and cut tool failures from weekly to monthly within two months. Steps:
- Check your filter housing model and note element part numbers.
- Buy replacement elements rated for 0.01–0.3 microns for oil and sub-micron particulate removal.
- Replace elements every 6–12 months or when differential pressure increases by 10–15 psi.
- Record the date and delta-P after each change.
Use a clean element and proper seals.
If you’ve ever had oil show up at the end-use point, check separators and coalescers — why it matters: these remove liquid oil and water that damage downstream equipment. Real example: a brewery in California saw oily droplets at packaging; replacing the coalescer fixed contamination within one day. Steps:
- Inspect separators/coalescers for damage and oil carryover visually and with a simple paper test.
- Measure differential pressure across each unit; replace when delta-P rises 10–15 psi or when visual tests show carryover.
- Match replacement media to your operating pressure and condensate load.
Keep the right element on hand.
Inspect piping and fittings for leaks — why it matters: leaks waste energy and hide pressure drops that stress compressors. Example: a textile plant found three 1/4-inch leaks in a header and recovered 15 kW of compressor load after fixing them. Steps:
- Walk the system with an ultrasonic leak detector or soapy water.
- Mark leaks and note estimated size (e.g., 1/16″, 1/8″, 1/4″).
- Tighten fittings, replace worn couplers, and clamp or replace corroded pipe within 7 days.
- Recheck system pressure and compressor run-time after repairs.
Aim to reduce leaks to less than 5% of total flow—measure before and after.
Improve condensate management — why it matters: unmanaged condensate with oil can violate disposal rules and damage drains. Example: a garage installed a certified separator and automatic drains; they stopped oily waste discharge and avoided fines during inspection. Steps:
- Install automated timed or level drains at receiver tanks and cold traps.
- Fit a certified oil/water separator before any drain that goes to sewer.
- Test the separator effluent monthly with simple kits and keep disposal records.
- Service separators per manufacturer schedules, usually every 3–12 months.
Use automatic drains and certified separators.
Consider control upgrades to stabilize pressure — why it matters: stable pressure reduces cycling and extends compressor life. Example: an automotive plant added a PLC-based setpoint and a larger receiver; compressor starts dropped from 20 to 6 per hour and oil temperature fell 8°C. Steps:
- Measure current pressure swings during peak and idle for 24 hours.
- Upgrade controls to include adjustable deadband, load/unload control, or VFDs for variable demand.
- Add or resize a receiver tank to provide 5–10 gallons of storage per cfm of compressor capacity.
- Reprogram setpoints to keep pressure within a 2–5 psi band.
Set the deadband to minimize starts.
Follow these checks and you’ll reduce failures, save energy, and stay compliant.
Training, Procedures, and Choosing Compliant Equipment
Before you start training operators, know why it matters: proper training cuts accidents and downtime. Think of your compressor room like a kitchen; one slip and things get dangerous. For example, a factory I worked with reduced leaks by 60% after a focused training day.
1) What training should you give your team?
Why it matters: trained staff respond faster and avoid mistakes that cause failures.
Steps:
- Run a 4-hour basic course that covers safe start-up, isolation, lockout–tagout, and emergency shutdown.
- Give a 30-minute hands-on demo with the actual panel and valves.
- Test each operator with a 10-question checklist and a practical task.
- Repeat the course every 6 months and after any incident.
Example: At a small plant, you showing operators how to lock the isolation valve and crowbar the circuit breaker prevented a costly restart the next week.
Document your procedures so anyone can follow them. Start each procedure with a one-line purpose. Include inspection intervals, filter checks, baghouse maintenance, and how to report leaks or pressure drops. Use this simple schedule:
- Daily: check gauges and listen for unusual noise (5 minutes).
- Weekly: inspect filters and drain receivers (15 minutes).
- Monthly: measure pressure drop across filters and inspect hoses (30 minutes).
- Annually: full service and pressure vessel inspection by a certified technician.
Example: A workshop logged daily gauge checks and caught a slow pressure drop that saved a compressor rebuild that would have cost thousands.
How to choose compliant equipment
Why it matters: the right gear keeps your system legal and reduces contamination risks.
Steps:
- Set procurement criteria that require AS/NZS or ISO certification and include an efficiency rating (e.g., kW per 100 CFM).
- Require manufacturers to state service intervals and local support availability in writing.
- Specify receivers and compressors that meet your jurisdiction’s registration and inspection rules.
- Choose oil-free or Class 0 compressors if your product needs high purity, and prefer models that meet DOE or equivalent efficiency standards.
Example: A food-packaging line switched to a Class 0 oil-free compressor and avoided product recalls due to oil traces.
Quick checklist to use when buying:
- Certification: AS/NZS or ISO — yes/no.
- Efficiency: stated kW/100 CFM or better.
- Service: local technician within 24 hours.
- Purity: oil-free or Class 0 when required.
Follow these steps, keep the schedules, and use the checklist so your compressed-air system stays safe, compliant, and reliable.
Frequently Asked Questions
How Do Compressor Warranties Change After Proven Negligence?
If you prove negligence, warranties often lead to warranty voidance and liability escalation; I’d tell you the manufacturer can deny coverage, charge repairs to you, and you’ll face greater legal and financial responsibility for damages or downtime.
Can Insurance Premiums Rise After a Compressed-Air Incident?
Right off the bat: I can confirm insurance premiums can rise after a compressed-air incident; insurers may apply insurance hikes via post incident underwriting, add premium surcharges, or impose policy exclusions depending on negligence and risk findings.
What Personal Protective Equipment Is Required for Compressor Room Work?
You should wear safety goggles and hearing protection, and I’d add steel-toe boots, gloves, and flame-resistant or anti-static clothing; I’ll also carry a lockout/tagout kit and respirator when dust or oil mist risks are present.
Are There Tax Incentives for Upgrading to Energy-Efficient Compressors?
Yes—I’ve found that many jurisdictions offer tax credits and rebate programs for energy-efficient compressors; I’d picture cash flowing back into your maintenance fund as utilities, federal incentives, and local rebates cut upgrade costs substantially.
How Should Legacy Piping Be Documented for Regulatory Audits?
You should document legacy piping with up-to-date As built drawings and thorough Maintenance logs; I’ll include serial numbers, materials, inspection dates, repairs, pressure test results, and photos, ensuring traceability for audits and regulatory compliance.