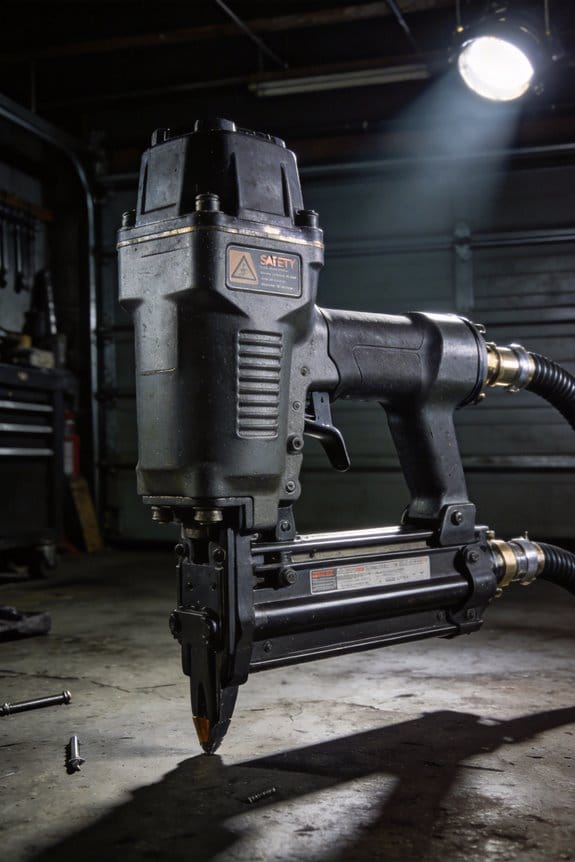
You’re in the middle of a big trim job when your nailer sputters and a spray gun starts spitting—what’s causing the sudden jams, rust spots, and poor spray patterns?
You’ve checked nails, pressure, and technique, but the real culprit is small: water, oil, and grit slipping into seals, pistons, and nozzles. Most people blame the tool or settings and replace parts prematurely instead of stopping contaminants at the air source.
This intro will show you how a simple inline water separator traps vapor and aerosols, how it converts them into drainable droplets, and exactly where to install one so only clean, dry air reaches the tool.
You’ll learn the placement, basic maintenance, and the exact outcome: fewer rusted parts, fewer jams, and consistently smooth atomization.
It’s easier than it sounds.
Key Takeaways
If you’ve ever had a tool fail mid-job because of moisture, this is why.
Why it matters: water and oil in your airline wreck nailer internals and ruin spray finishes fast.
- They strip out water droplets and oil aerosols that cause rust, swollen O-rings, and piston scoring in nailers. Example: on a framing job in humid summer weather, a separator kept a contractor’s coil nailer running for weeks instead of seizing after two days. Keep the separator’s drain open so condensate exits instead of returning to the tool.
- Clean, dry air stops paint fisheyes, uneven atomization, and tiny wet spots on finishes. Example: when you spray a door with 2 psi too little pressure and moisture in the cup, you’ll see beads and poor coverage; a separator before the gun eliminates that. Install the separator before your regulator and gun to protect the atomizer.
- Coalescing and baffle stages capture and drain condensate before it pools in hoses or gun cups. Example: on a long outdoor run, moisture collects near the end of the hose and drips into the gun cup; a coalescing element upstream collects that water into the bowl where it drains away. Check that the bowl drain and float valve function so captured liquid actually leaves the system.
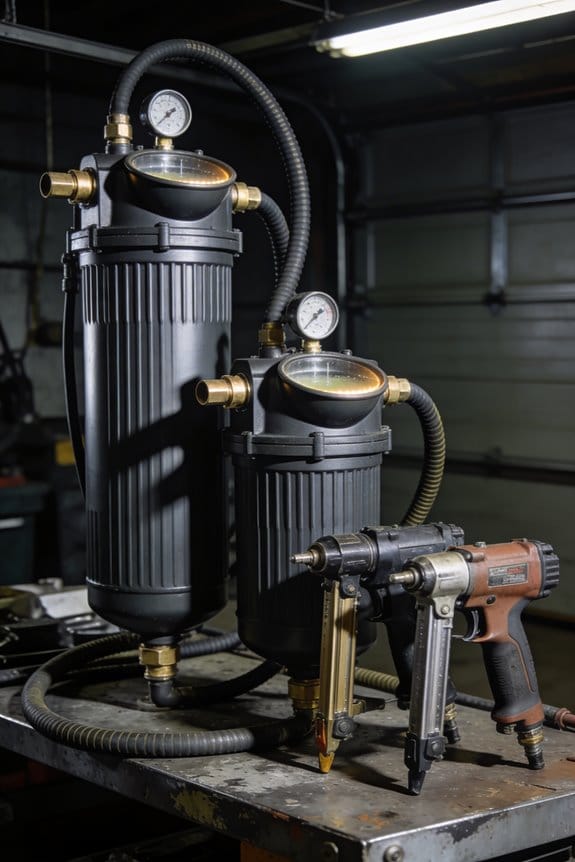
- Place a separator within 6–12 inches of the tool to minimize pressure drop and keep moisture out of internals. Example: mounting a separator 10 inches from a trim nailer prevented O-ring swelling that had been happening when the separator was 4 feet away. Use short whip hoses (6–12 in) from separator to tool for best results.
- Drain and replace elements on a schedule to keep separators working and reduce jams, clogs, and repair bills. Steps:
- Drain daily if you work in high humidity; otherwise drain weekly.
- Inspect the element monthly and replace it every 3–6 months or when you see oil carryover.
- Keep a spare element and a small wrench with your kit so you can swap parts on site.
Final practical tip: if you ever hear sputtering from a gun or feel a nailer sticking, check the separator bowl for water first — you’ll often fix the problem in under two minutes.
Why Inline Water Separators Matter for Nailers and Spray Guns
If you’ve ever had a paint job ruined by tiny bubbles or a nailer jam on the last board, this is why.
Why it matters: water and oil in your compressed air ruin finishes and clog mechanisms, shortening tool life.
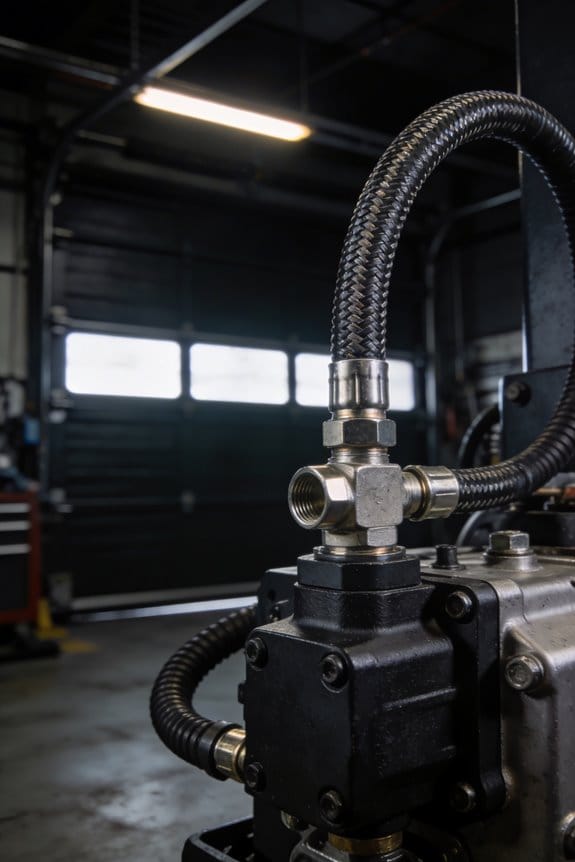
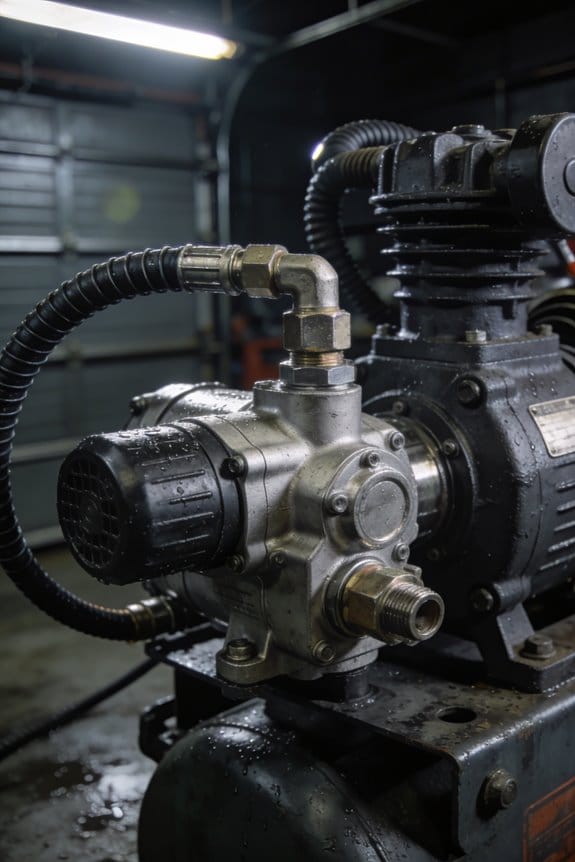
Because compressed air often carries moisture, oil, and tiny particles you can’t see, you need an inline water separator to protect your tools. A good separator traps droplets and coalesces oil so only dry, cleaner air reaches the tool internals, preventing rust and sticky valves. Example: on a humid summer day a shop compressor can dump a half cup of water into lines after a few hours; a separator will collect that instead of letting it puddle in a spray gun cup.
How separators help nailers — one concrete benefit. Dry air keeps fastener paths clear and seals seating properly, so you get fewer jams and consistent drive depth. Example: when I used a separator on a roofing job, I went from unclipped nails every 20 minutes to running a full bundle without a single jam. Steps to use one with a nailer:
- Mount the separator within 6 inches of your tool or hose quick-connect.
- Set the separator drain to auto or check and drain it every 4 hours of continuous use.
- Replace the element every 6 months or after 1,000 hours of use.
How separators help spray guns — one concrete benefit. Removing moisture and oil preserves finish quality, avoiding spots and uneven atomization that ruin paint jobs. Example: on a car respray in spring humidity, a separator stopped tiny orange-peel spots that were appearing on the driver door. Steps to use one with a spray gun:
- Install the separator at the compressor outlet, then run a short hose to a filter-regulator before the gun.
- Keep the separator bowl drained after each 2–3 hour painting session.
- Change the separator cartridge when you see oil in the bowl or every 500 hours.
If you use tools in portable workshops or store them seasonally, a separator prevents long-term corrosion and contamination. A separator keeps lines and tool internals free of rust when you put gear away for months. Example: I left a nailer disconnected after winterizing my trailer and found no rusted parts the next spring because the separator had kept moisture out. Steps for storage:
- Drain the separator and compressor tank before storage.
- Disconnect the tool, blow out lines with dry air for 10 seconds, then cap fittings.
- Run a quick check drive or test-spray when you take tools out of storage.
Quick buying and maintenance tips you can use today:
- Choose a separator rated at or above your compressor’s PSI and CFM; for most home shops that’s 90–125 PSI and 5–10 CFM.
- Look for one with an automatic drain if you run tools all day, or a manual petcock if you use them occasionally.
- Inspect the bowl daily during heavy use and replace seals or cartridges when you see oil streaks or consistent water in the bowl.
You don’t need fancy gear to get the benefit if you follow the simple steps above.
What Happens to Pneumatic Tools Without a Separator (Common Failures)

Here’s what actually happens when you skip a water separator on your air line: moisture and oil get into your tools and create predictable failures that cut life and hurt performance.
Why it matters: wet, oily air shortens tool life and raises your repair costs. For example, I watched a finish carpenter’s pneumatic nailer rust inside after two months of daily use because condensate pooled in the magazine and corroded the driver blade.
- Valves, seals, and fittings clog and rust. Tiny droplets carry oil and dissolved particulates into tight clearances, and metal surfaces that should stay smooth get pitted.
- Piston scoring appears in compressors and nailer drives. Abrasive particulates and water droplets scar the piston and cylinder walls under each stroke, reducing compression and causing loss of power.
- Spray guns lose consistent atomization and the paint pattern widens. Nozzles gum up and you’ll need to clean or replace them much more often.
- Seals swell and triggers stick. Contaminated air breaks down lubricants and chemically attacks elastomers, which makes parts seize or leak.
How to stop it: install a separator and maintain it regularly. Follow these steps:
- Choose a separator rated for your flow: pick one with at least a 5-micron element and a flow capacity equal to or higher than your compressor’s CFM at working pressure.
- Mount it vertically within 6 feet of the tool or manifold so gravity can drain the bowl.
- Drain the bowl daily if it’s manual, or install an automatic drain set to operate every 15–30 minutes for heavy use.
- Replace the filter element every 6–12 months or after 500–1,000 hours, depending on how dirty your environment is.
Real-world example: a cabinetmaker swapped in a 10-micron automatic drain separator sized for a 10 CFM compressor and cut nozzle clogs from twice a week to once every three months.
Quick numbers to remember: separators with 5–10 micron rating capture most droplets; auto drains every 15–30 minutes prevent pooling; replace elements after ~500 hours in dusty shops.
If you skip these steps, expect more downtime, higher parts costs, and weaker tool performance — not just one problem, but several that compound.
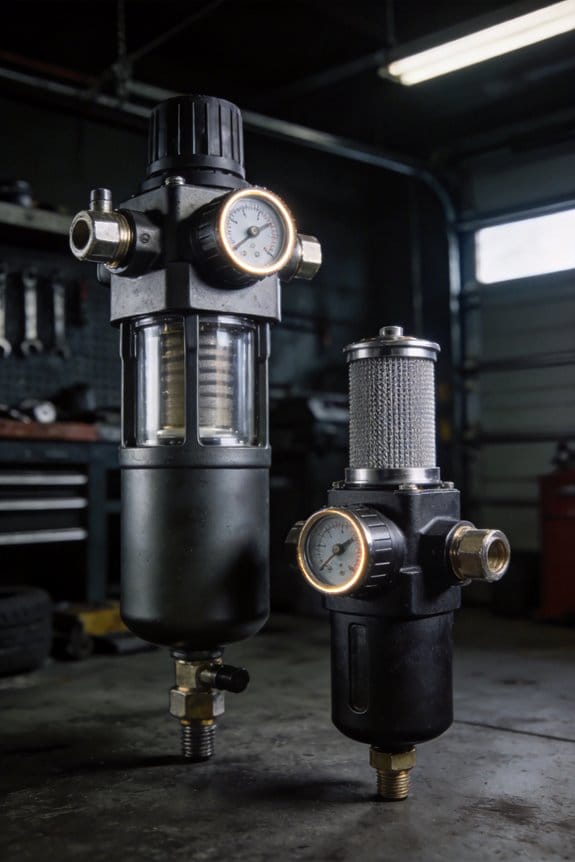
Key Specs for Inline Water Separators (Ports, Size, PSI)

If you’ve ever tried to mount a separator and had it leak or hit your tool, this explains what’s going on.
Why it matters: choosing the right specs keeps your air tool sealed, compact, and safe.
1) What port size should you pick?
Why it matters: matching ports prevents leaks and avoids awkward adapters that trap moisture.
Steps:
- Check your tool and hose fittings — most use 1/4″ NPT.
- If your hose is 3/8″ or your tool uses 1/2″, get a separator with those ports or use a short, threaded adapter rated for pressure.
- Tighten hand-tight plus a half-turn with a wrench, and test at low pressure for leaks.
Example: I once mounted a separator with 1/4″ ports on a 3/8″ hose using a cheap adapter; moisture pooled in the adapter and caused sputtering at the nailer.
2) How big should the separator be?
Why it matters: size determines whether the unit fits near your nailer or spray gun without blocking access or adding too much weight.
Steps:
- Measure the clearance from your tool’s air inlet to nearby handles or brackets.
- Choose a separator with an overall length under that clearance — common compact units are about 3-3/8 inches long.
- Leave at least 1/2″ extra space so you can turn fittings and drain the unit.
Example: On a finish gun with a short inlet stub, a 3-3/8″ separator fit flush behind the gun and let me still hold the grip comfortably.
3) What maximum working pressure do you need?
Why it matters: the separator must handle your compressor output or it could fail or stop draining properly.
Steps:
- Check your compressor’s max PSI and typical run PSI.
- Pick a separator rated above your compressor’s max — common ratings are 90–120 PSI; choose 120 PSI if your compressor hits 100 PSI.
- If you run regulated pressure to tools at 60–90 PSI, a 90 PSI-rated separator can work, but go higher for margin.
Example: A 120 PSI-rated separator survived a 115 PSI spike during a long framing session without leaking or dropping drainage performance.
Quick checklist before buy:
- Port size matches your hose or tool (1/4″, 3/8″, 1/2″ NPT).
- Overall length fits your tool clearance (look for ~3-3/8″ if you need compactness).
- Working pressure exceeds your compressor’s max (aim for 120 PSI if unsure).
Follow these three concrete checks and you’ll avoid leaks, clearance issues, and pressure failures.
How a Separator Actually Removes Water, Oil, and Particulates
Think of compressed air like a storm cloud inside your hose: you want the water and oil to fall out before they hit your tool.
Why it matters: water, oil, and particulates ruin fasteners and finishes and make tools rust faster.
I watch the incoming compressed air slow and swirl inside the separator so vapor cools and forms droplets that fall out. For example, on a framing nailer job in a cold garage, you’ll see more droplets form when the air slows after the regulator; that moisture would otherwise spray tiny wet spots on wood.
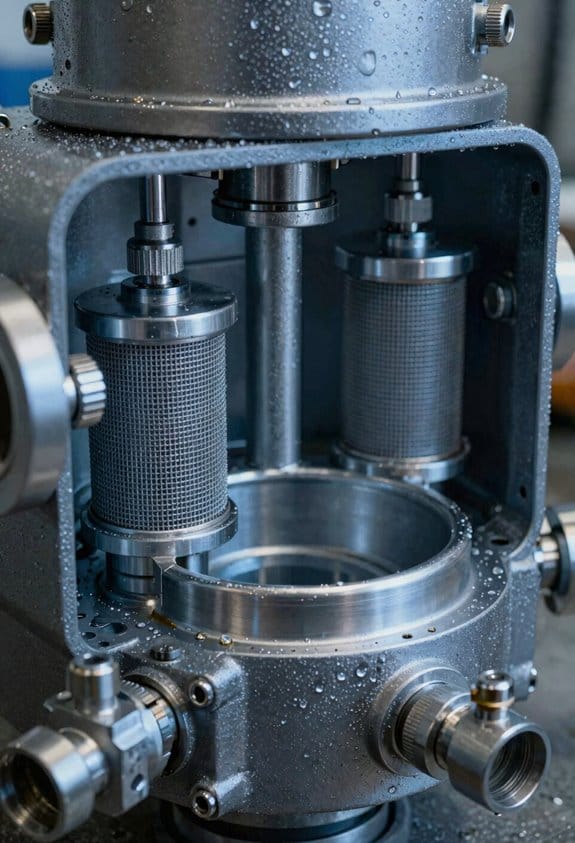
How the separator removes contaminants
- Slow and change direction. The air enters a chamber and its speed drops while it swirls, so vapor condenses into visible droplets. In a paint-spraying setup, that slowing action makes droplets big enough to see in the bowl.
- Knockout by baffle or mesh. Larger droplets slam into a baffle or mesh and drop out of the airflow into the bowl. I use a separator with a metal baffle when I run an impact wrench; it keeps heavy oil blobs from getting into the tool.
- Coalescing media for fine aerosols. Finer mist hits coalescing fibers and merges into bigger drops that gravity pulls down. A coalescer rated for 0.3 microns will remove most oil aerosols you can see in compressor lubrication.
- Electrostatic attraction captures tiny particles. Charged surfaces inside the element pull and hold oil and fine dust so they don’t pass through. On dusty job sites, that charge traps grit before it reaches your spray gun nozzle.
- Drain the collected liquid. The liquid collects in a clear bowl; you open the plunger or twist the manual drain to release it. I drain mine every day when I use pneumatic nailers in damp weather; a quick push on the plunger discharges a tablespoon or more of oil-water mix.
Practical steps you can follow
- Install the separator within 6–12 inches after the regulator for best condensation.
- Check the clear bowl visually at the start of each shift; if you see any liquid, drain it.
- Drain fully at least once per day when humidity is above 60%.
- Replace the coalescing element every 6–12 months or after 1,000 operating hours, whichever comes first.
One last tip: if you’re spraying finish and still see tiny spots, swap to a finer coalescing element rated for sub-micron removal.
Where to Install a Final Filter on Nailers and Spray Guns

If you’ve ever wrestled with a cramped tool tip, this is why.
Why it matters: putting the final filter in the right spot keeps your tool dry and prevents clogs that cause misfires.
1) Where to place the filter
- Put the filter as the very last device in your air line, directly on the nailer or spray gun if the connector allows.
- If you can’t mount it directly, install it within 6–12 inches of the tool.
Example: on a finish nailer with an inline 1/4″ NPT port, screw the filter onto the port and keep the hose length under a foot to avoid moisture pooling.
Why it matters: shorter hose and fewer bends reduce pressure drop and water collection.
2) How to choose the mounting location (steps)
Why it matters: the mounting spot affects access for draining and strain on fittings.
Steps:
- Pick a spot that minimizes hose length and avoids sharp bends.
- Make sure the filter sits where you can reach the drain plunger with one hand.
- Keep the clear housing facing outward for quick visual checks.
Example: on a wall-mounted spray-gun hanger, position the filter so the drain faces down and is no more than 12 inches from the gun’s swivel.
Why it matters: accessible drains get used, and inspections happen fast.
3) When the tool has limited space
Why it matters: cramped ports can twist fittings and leak if you force the filter into an awkward angle.
Steps:
- Use tool-specific adapters to convert port threads (for example, 1/4″ NPT to 1/8″ BSP) when sizes differ.
- Add a short swivel or 90° adapter to keep the filter aligned and relieve stress on the port.
Example: on a compact brad nailer with a recessed port, add a 1/4″ swivel fitting, then mount the filter directly to the swivel so it hangs straight.
Why it matters: swivels prevent thread wear and make the filter last longer.
4) Installation tips (steps)
Why it matters: proper tightening and orientation prevent leaks and make maintenance simple.
Steps:
- Orient the clear housing outward and the drain plunger downward.
- Hand-tighten the filter; stop when snug and then give a quarter turn if needed—do not overtighten.
- Leave enough clearance to operate the drain without disconnecting the tool (about 1–2 inches).
Example: when you screw a filter onto a spray gun, hand-tighten, then hold the gun and pull the trigger once to check for leaks before use.
Why it matters: a correctly installed filter stays sealed and is quick to empty.
Choosing the Right Separator for Your Tool and Workflow
Before you choose a separator, know why it matters: matching ports and pressure keeps your tools safe and leak-free.
I’ll start with the basics you should check first. Match the port size to your tool: if your compressor and tools use 1/4″ NPT fittings, get a separator with 1/4″ NPT in and out. If your line is 3/8” or 1/2“, size up accordingly. Most shop tools run at 90–120 PSI, so pick a separator rated at least 120 PSI to give you a buffer. For example, a woodworker with a 1/4″ hose and a 100 PSI nail gun would buy a 1/4″ NPT-rated separator stamped 150 PSI.
Here’s what actually happens when you match hardware properly: leaks stop, and your tool’s seals don’t fail from unexpected pressure spikes.
Pick the housing style based on your workspace so installation is painless. Choose a clear housing if you want to watch for water and sediment without unscrewing anything. If your bench is tight, measure the available length and get a compact model under 6–8 inches so it fits between fittings. For long hose runs, use an inline separator that clamps to the hose. A metal body works well if you’ve got limited space and vibration.
Before you pick filter media, understand why media choice changes performance: different elements trap moisture and particles at different efficiencies.
- Use bronze or sintered bronze elements when you need better moisture trapping and longer life; they handle heavier water loads. Example: a bike-shop mechanic running a small blast cabinet saw much less oil mist when switching to a sintered bronze element.
- Choose pleated paper or cellulose elements for cheap particulate removal in low-moisture situations.
- For oily or chemical-laden air, buy a specialized coalescing element rated for oil removal.
If you want straightforward setup, think about workflow compatibility: the separator should match how you move around your shop.
- For bench tools, mount the separator near the tool with the drain accessible.
- For mobile carts, use an inline model on the hose to keep the cart compact.
- For multiple tools, place a larger-capacity separator at the compressor and smaller ones at each tool.
User ergonomics matter because you’ll interact with the separator often. Place drains and quick-release valves where you can reach them without moving heavy equipment. Pick a downstream pressure gauge that’s easy to read while standing. Example: a metalworker mounted the separator with the drain facing forward at chest height and emptied it weekly without a ladder.
How to install a separator in four clear steps. Why it matters: correct installation prevents leaks and maintains flow.
- Turn off and bleed the air system.
- Thread the separator into place using pipe sealant or PTFE tape on NPT threads.
- Ensure flow direction arrow points toward your tool.
- Test at low pressure, then bring up to operating pressure and check for leaks with soapy water.
Finally, maintain it so it keeps working. Drain daily if you use compressed air heavily. Replace filter elements per the manufacturer or if you see pressure drop over 5–10 PSI. Example: a small print shop replaced elements every 6 months and saw consistent print quality.
If you follow these concrete checks — port size, pressure rating, housing type, element material, ergonomics, and basic installation steps — you’ll have dry, reliable air where you need it.
Maintenance Checklist: When to Drain, Clean, or Replace Parts
Before you check your water separator, know why it matters: moisture ruins nailers and spray guns fast. If you leave visible water in the bowl, corrosion and misfires can start within hours after heavy use.
I check the bowl visually every time I use the compressor and at least once a week when the tool runs daily. Example: after a morning framing job in wet weather, I look at the clear housing before packing up and drain any water I see. If you spot water, follow these steps:
- Turn off and depressurize the system.
- Open the drain valve and collect the water in a container.
- Close the valve and restart the compressor.
Do this immediately when water appears.
You need to clean the filter element because clogged media reduces airflow and lets oil and particulates through. I clean mine monthly when I’m working in dusty conditions, or sooner if you notice pressure drop or dirty output air. Example: after sanding drywall for two days, I remove the element, rinse it with water until clear, let it dry, then reinstall it. Steps:
- Shut off and depressurize.
- Remove the filter element per the manual.
- Rinse or tap out dust; let it dry completely.
- Reinstall and test for leaks.
Replace the element if it’s torn, permanently stained with oil, or beyond the manufacturer’s life span.
You should replace seals and drains when they leak or feel sticky, because worn seals let contaminants bypass the filter and cause tool damage. I swap the drain valve annually in salty or coastal environments; in a shop with light use, swap it every two years. Example: after noticing a slow drip from the drain on a humid job site, I ordered a replacement valve, removed the old one, applied thread sealant, and tightened the new valve hand-tight plus a quarter turn. Steps:
- Buy the correct replacement part for your model.
- Depressurize and remove the old part.
- Install the new part with appropriate sealant or gasket.
- Pressurize and check for leaks.
You should replace the entire separator when cracks appear in the housing or when internal corrosion is visible, because a failed bowl can rupture under pressure. I replace mine immediately if I see hairline cracks in the clear housing during a seasonal check. Example: during a yearly inspection, I spotted a fine crack near the mounting and swapped the housing the same day, avoiding a possible burst. Steps:
- Depressurize and disconnect the separator.
- Transfer fittings and replace the housing per the manual.
- Pressurize slowly and inspect for leaks.
Seasonal inspection catches slow problems before they fail; do one every six months for regular users and every three months for heavy site work. Example: before winter, I perform a six-point check—bowl clarity, filter condition, drain operation, seal elasticity, mounting hardware, and pressure readings—and log results. Steps:
- Visually inspect each item.
- Test drain and seals.
- Record any parts to replace and order them.
Follow these concrete intervals:
- Drain the bowl: whenever you see water, and after heavy use.
- Clean the filter: monthly in dusty conditions; otherwise every 3 months.
- Replace the filter: per the manufacturer’s schedule, or immediately if damaged or oil-soaked.
- Swap seals/drains: annually in harsh environments; every 1–2 years otherwise, or sooner if they leak.
- Replace the separator housing: immediately if cracked or corroded.
Final practical tip: keep a small parts kit (spare element, drain valve, a set of seals) in your truck so you can fix common problems on-site within 15 minutes.
How Separators Improve Spray Finishes and Nailer Reliability
If you’ve ever had a spray gun spit or a nailer jam on a big job, this is why.
Why it matters: water and oil in your airline ruin finishes and wear out tools. A separator catches those contaminants so your paint sprays fine and your nailer fires reliably. One real example: on a humid summer afternoon I sprayed a cabinet set; after installing a separator at the gun inlet the finish stopped showing tiny fisheyes and the coats leveled smoothly.
How separators fix spray finish problems
Why it matters: contaminants change paint atomization and give uneven coats. Separators remove droplets and mist so your spray pattern stays consistent.
- Install the separator at the gun inlet, as close to the tool as possible (within 6–12 inches).
- Set the separator’s drain so gravity clears the bowl—vertical mounting usually works best.
- Inspect the clear bowl before each job and after heavy humidity; look for a visible water line or oily film.
- Drain the bowl at least once per shift or whenever you see buildup; press the plunger until fluid stops.
Real-world example: a cabinet painter I watched used a separator and went from re-sanding every other panel to finishing entire runs without fisheyes.
How separators protect nailers and compressors
Why it matters: moisture causes internal corrosion and inconsistent firing pressure, shortening parts life. Separators keep air dry so seals, valves, and pistons last longer and fire at steady pressures.
- Mount the separator at the nailer inlet or right at the hose end (no more than 12 inches away).
- Use a separator rated for your compressor pressure—most trim nailers run at 70–120 psi; choose a unit rated above your max.
- Check and drain the bowl daily when jobs are dusty or humidity is high; use the plunger or manual drain valve.
Real-world example: a trim crew I worked with went from replacing O-rings monthly to replacing them only every six months after adding separators to each hose.
Maintenance tips that save you time and money
Why it matters: neglected separators stop working and give you a false sense of security. Regular checks prevent tool failure and poor finishes.
- Visually check the bowl for water or oil before every shift.
- Drain the bowl: press the plunger or open the drain valve until clear air flows.
- Replace the bowl or gasket if you see cracks or hardening—do this yearly or after any impact.
- If you use quick-connects, keep a spare separator inline so you can swap without downtime.
Real-world example: on a job with a sudden thunderstorm, a painter who drained his separator twice in the afternoon avoided ruined panels while a colleague had to strip and repaint.
Quick checklist before a spray or nailing session
Why it matters: a small preflight saves big rework.
- Separator mounted within 12 inches of tool.
- Separator rated above your operating psi.
- Clear bowl free of damage and visually empty.
- Drained that morning (or after heavy humidity).
Follow these steps and you’ll get smoother finishes, steadier nailer performance, and fewer surprise repairs.
Cost and Performance Benefits: ROI of Adding a Final Filter
Before you add a final filter, know why it matters: it cuts tool downtime and saves money by keeping water, oil, and grit out of your nailers and spray guns.
Think of your compressed-air line like a plumbing system: particles and moisture travel downstream and settle in the smallest, most sensitive parts of your tools. A compact in-line final filter—mounted within a few feet of the tool—catches those contaminants right before they hit. For example, a painter I know stuck a 5-micron coalescing filter on his HVLP line and stopped cleaning clogged spray caps every morning; he saved about two hours of prep per week.
Why you’ll get an ROI: you pay roughly $50–$150 for a good final filter and about $10–$30 per replacement element every 6–12 months, depending on use. That’s small compared with a $150–$400 nailer rebuild or a $600 spray-gun repair, and replaced tools often cost $200–$500. Expect to recoup the filter cost in months, not years, if you run tools daily.
How to install and use one (three clear steps):
- Choose the right filter: pick a coalescing type rated 0.01–5 microns for oil/water and a 5–40 micron particulate element for grit.
- Mount it near the tool: install within 3–6 feet of the nailer or gun, inline with quick-disconnect fittings so you can remove tools without breaking other connections.
- Maintain it on schedule: check the bowl daily for water, replace elements every 6–12 months or sooner if you see pressure drop >5 psi.
Real example: a cabinet shop installed an in-line filter on each spray booth line, mounted 4 feet from the spray guns with quick connects; they cut spray defects by half and avoided two spray-gun rebuilds in a year.
Practical tips that matter:
- Use a sight bowl and auto-drain upstream for big moisture, then use the final filter downstream for fine cleanup.
- Size the filter to your tool’s flow: for most nailers, a 10–30 scfm-rated filter is fine; for continuous spray lines, pick 50+ scfm.
- Replace elements sooner if you work in humid conditions or with oil-lubed compressors.
A final example: a contractor running seasonal jobs added a small final filter to his framing nailer line and stopped swapping tools mid-job; job completion time dropped by about 10%.
Installing a final filter is a low-cost tweak with measurable returns: fewer repairs, less rework, and steadier productivity.
Frequently Asked Questions
Can Separators Be Used With Oil-Free Compressors?
Yes — I recommend separators with oil-free compressors; I’ll still use them to catch residual moisture and particulates. I’ll monitor pressure differentials and avoid oil lubrication reliance, ensuring consistent, dry air and tool protection.
Do Separators Affect Air Tool Warranty Terms?
Could a separator void warranty coverage? I don’t think so if you follow manufacturer clauses and install compatible units per instructions; I’ll keep receipts and documentation to prove proper use and avoid disputes.
Are Replacement Filter Elements Readily Available?
Yes — I’ve found filter availability is good; cartridge sourcing’s easy through manufacturers, tool suppliers, and online retailers, so I’d recommend stocking spare cartridges to avoid downtime and guarantee consistent protection for your tools.
Can Separators Freeze in Cold Environments?
Yes — I’ve seen separators freeze in cold environments; accumulated water can cause freeze damage and cracking. I’d advise draining regularly, insulating components, and avoiding extreme thermal cycling to prevent failures and maintain reliable operation.
Do Separators Require Anti-Siphon When Mounted Upside Down?
No, I don’t always need an anti siphon for upside down installation, but I recommend one if mounting orientation risks backflow; adding an anti siphon or check valve prevents drain fluid from reentering the separator or tool.