You’re standing in the garage with a trim nailer, a low tire, and a lightweight air wrench, and the compressor wheezes while the tools sputter. You need to know if that compact unit can actually run your trim gun, inflate tires properly, and handle quick fastening without stalling.
Most people just look at tank size or peak PSI and assume the compressor will work fine. This intro will show you how to match tool CFM at the tool’s operating PSI (often 90 PSI) to the compressor’s measured CFM, add a 20–30% margin for repeated bursts, and check duty cycle so the unit won’t overheat.
It will also explain picking hoses, regulators, and fittings to avoid pressure drop and managing cooling and tank recovery. It’s easier than it seems.
Key Takeaways
If you’ve ever fumbled with a small compressor and a nailer, this will help.
Why it matters: matching the right compressor keeps your trim work smooth and your inflation accurate so you don’t waste time waiting for pressure.
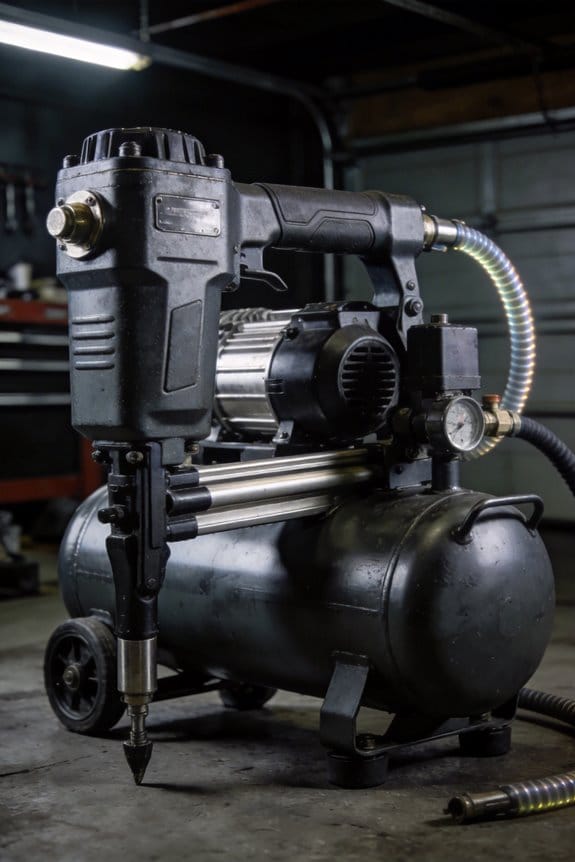
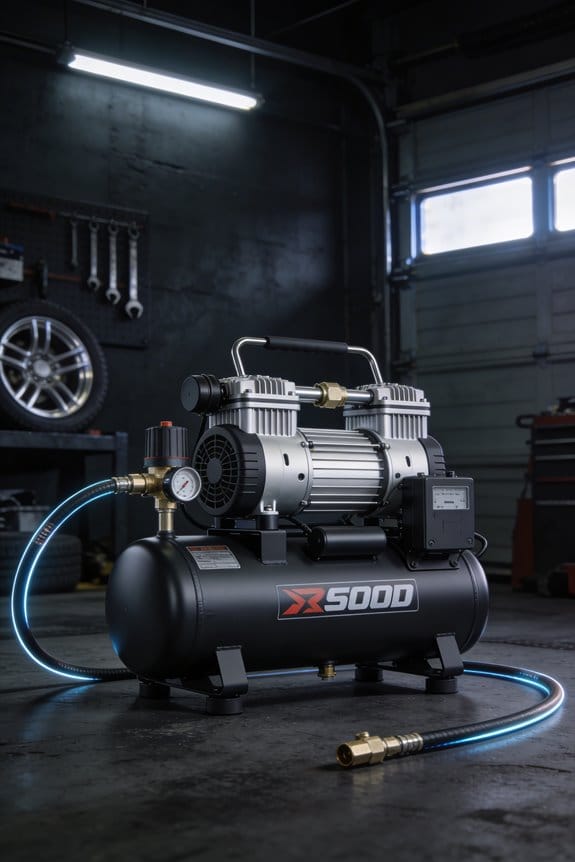
- Compact compressors typically deliver about 0–5 CFM at 70–90 PSI, which is ideal for trim nailers and light finishing work. Example: a 2 CFM unit at 90 PSI will run a 16-gauge finish nailer for several minutes before the pump cycles.
- Portable units rated to roughly 150 PSI with 1–3 CFM let you inflate car or light-truck tires quickly on-site. Picture inflating a 205/55R16 tire from 20 to 32 PSI in a couple of minutes with a 2 CFM compressor.
- For intermittent fastening, do this: 1) Add 20–30% to the tool’s rated CFM at its operating PSI to get your required compressor CFM; 2) Choose a unit that meets that number as continuous CFM; 3) Confirm the tank size supports a few cycles without long recovery. Example: a brad nailer needing 0.5 CFM at 90 PSI works well with a 1.0–1.3 CFM continuous compressor and a 2–3 gallon tank.
- Match the tool’s CFM@PSI (often 90 PSI) to your compressor’s continuous CFM and tank size for consistent performance and fewer recovery cycles. For example, a finish nailer drawing 2 CFM at 90 PSI should pair with a compressor that provides at least 2.5 CFM continuous and a 6+ gallon tank.
- Use proper hoses, quick-connects, a regulator, and dual gauges to keep PSI steady and get accurate inflation and fastening. One real-world setup: a 3/8″ hose, a 1/4″ quick-connect, a regulator set to 90 PSI, and a tank gauge plus outlet gauge will hold pressure better than cheap fittings.
How to pick a compressor in three steps:
1) Check your tool’s CFM at its operating PSI.
2) Multiply that CFM by 1.2–1.3 to get the target continuous CFM.
3) Pick a compressor that meets the target CFM and has a tank sized for several cycles (2–6 gallons for finishing, 6–20+ gallons for sustained work).
Final practical tip: keep a compact inflator (around 2 CFM and 150 PSI) in the trunk for tires and a separate finishing compressor (2–5 CFM at 70–90 PSI with a 2–6 gallon tank) in your workshop. This avoids running one unit for everything.
Compact Compressor Buying Guide: CFM, PSI, Duty Cycle
If you’ve ever started a project and had your compressor stall, this is why.
Why it matters: mismatched specs mean your tools either run poorly or overwork the compressor. Start by matching your compressor’s CFM, PSI, and duty cycle to the tools you’ll run.
Why it matters: the tool will stop working if it needs more air than the compressor gives. Step 1: check the tool’s CFM requirement on its label or manual. Step 2: check the compressor’s rated CFM under load or “measured CFM” in the spec sheet. Example: a 3/8″ air ratchet often needs about 4–6 CFM at 90 PSI, so a compressor listing 5 CFM at 90 PSI is a good match.
Why it matters: pressure controls whether the tool delivers force and consistency. Look for the compressor’s rated PSI and confirm it can hold the pressure your tool needs without dropping below that while running. For most trim guns and tire inflators, plan for around 150 PSI — so pick a unit that sustains 150 PSI without short cycling. Example: if you’re inflating ATV tires and the gauge falls from 150 to 120 PSI under load, the compressor isn’t keeping up.
Why it matters: running too long will overheat the compressor and cut jobs short. Duty cycle tells you how long the unit can run each hour as a percentage — 50% means 30 minutes on, 30 minutes off. If you’re sanding or spraying for long stretches, pick a duty cycle of 70% or higher. Example: for painting one car door (about 20 minutes of continuous spray), a 50% duty cycle compressor will be fine; painting a whole car needs 70%+.
Quick checklist you can use:
- Match CFM: list your tools’ peak CFM, then choose a compressor with equal or higher measured CFM at the same PSI.
- Verify PSI stability: confirm the compressor holds the required PSI under load — aim to keep the pressure within ±5 PSI of the tool’s target.
- Pick duty cycle: choose a duty cycle that covers the longest continuous task in an hour without forcing forced cool-downs.
Practical tip: when in doubt, add 20–30% extra CFM to your tool requirements to avoid short cycling and pressure drops. Example: a nail gun needing 2 CFM is safer on a compressor rated 2.5–3 CFM.
That’s everything you need to match a compact compressor to your tools: CFM, PSI, and duty cycle — checked, measured, and sized with a little margin.
Match Compact Compressors to Tasks: Trim, Inflation, Fastening

If you’ve ever been on a jobsite and had a compressor stall, this is why.
Why it matters: a mismatched compressor wastes time and can ruin finish work. For trim work you want a compact unit that delivers steady 0–5 CFM at 70–90 PSI so your staplers and finish nailers recover quickly between shots. Example: when you’re installing baseboard in a 12-foot room with a 3/8″ crown stapler, a 1.5-gallon pancake compressor that gives 4 CFM @ 90 PSI will recover fast enough so you don’t pause every few nails.
How to pick for trim (steps):
- Check tool specs for required CFM at 90 PSI.
- Choose a compressor rated slightly above that number (add ~20% for safety).
- Prefer tanks 1.5–4 gallons for portability and quick recovery.
Tip: quieter models around 60–70 dB make long trim jobs less fatiguing.
If you’ve ever tried to inflate tires with a bulky shop compressor, this is why.
Why it matters: inflation needs pressure and portable flow so you can move between vehicles. For tire inflation, get a portable maintenance unit rated to 150 PSI with consistent flow of about 1–3 CFM at 90–120 PSI depending on tire size. Example: inflating a full-size truck tire from 30 to 35 PSI is quick with a 150 PSI portable compressor that delivers 2 CFM at 90 PSI; you’ll be ready to drive in under a minute.
How to pick for inflation (steps):
- Ensure the unit’s max PSI is 150 or higher.
- Confirm it lists CFM at the PSI you’ll use (90–120 PSI).
- Choose a model with a hose reel or coiled hose for mobility.
Tip: battery or DC-ready units let you work away from power outlets.
If you’ve ever run a small framing task with a weak compressor, this is why.
Why it matters: light fastening needs sustained flow so your nailer or impact driver doesn’t starve. For light fastening pick a model that sustains closer to 40 CFM for continuous use with small nailers and impact tools; avoid compressors advertised only for intermittent jobs. Example: driving a few hundred 2 1/2″ framing nails on a shed wall will go smoothly with a 30–50 CFM unit — anything under 20 CFM will make the tool feel sluggish and overheat the compressor.
How to pick for light fastening (steps):
- Read the tool duty cycle and required CFM at operating PSI.
- Match to a compressor rated for continuous duty near that CFM.
- Check the compressor’s duty cycle percentage (50%+ for long runs).
Tip: look for thermal protection and a larger tank (20+ gallons) if you expect long, continuous fastening.
Consider noise and duty cycle as part of your choice because both affect how long you can run without interruptions. Example: a quieter belt-drive compressor rated for 50% duty at 40 CFM will run longer between cool-downs than a noisy oil-free pancake rated for 25% duty.
Best Compact Compressor Setups for Finish Carpentry and Trim

If you’ve ever finished trim and had your nailer sputter mid-stroke, this is why.
You need steady pressure so every nail seats the same way, which prevents splits and nail pops. I recommend a compact, oil-lubricated compressor rated for 20–30 CFM at 90–150 PSI; that gives you the sustained push finish nailers and staplers need for consistent drives. Example: a 1.5–2.0 HP oil-lube pancake or small twin-stack that lists 25 CFM at 90 PSI will handle 16-gauge and 15-gauge finish nailers with fewer drops in performance.
You’ll want a tank that buffers short bursts. Get a 6–10 gallon tank so the pressure doesn’t sag when you fire several nails quickly. For intermittent work on baseboards and casings, add a quick-fill inline coil (3/8″ ID, 50–100 ft for reach) so you can move around without dragging the compressor.
Why tidy storage matters: cluttered hoses waste time and cause trips. Install a wall rack for the compressor and a spring rewind hose reel near your cutting station so fittings stay readable and ready. Example: mount a 50 lb-rated steel wall bracket 18–24 inches off the floor and place the reel 6–8 feet from your workbench to keep a 25 ft hose reachable.
You’ll also want to keep noise down so you can focus on tight joints and clean miters. Fit a threaded muffler on the intake, add a 1–2″ layer of insulation inside a plywood housing with vents, or choose a quieter belt-drive model that lists lower dB (look for 60–70 dB). Example: replacing a standard muffler with a turbo-style one can drop perceived noise by about 5–8 dB during long sessions.
Quick checklist (steps):
- Pick compressor: oil-lubricated, 20–30 CFM at 90–150 PSI, 1.5–2.0 HP.
- Choose tank: 6–10 gallons.
- Add mobility: 3/8″ ID quick-fill line, 50–100 ft coil or a 25 ft hose on a reel.
- Outfit storage: wall rack rated for your unit and a reel mounted 6–8 ft from the bench.
- Reduce noise: threaded muffler, insulated housing, or belt-drive unit.
Concrete example to visualize: a contractor-grade 1.8 HP oil-lube twin-stack with 25 CFM at 90 PSI, 8-gallon tank on a wall bracket, 25 ft hose on a spring rewind reel, and a turbo muffler will let you run a 15-gauge finish nailer across a full room of baseboard with minimal pressure drop and less noise interference.
Quick Tire and Inflation Workflows With Portable Compressors
If you’ve ever needed to inflate a tire quickly on the job, this is why steady pressure and the right setup matter. One flat minute with the wrong compressor and you’ll waste time and overheat the unit.
Why this matters: steady pressure keeps inflation tools predictable so you don’t over- or under-fill tires.
1) Pick the right portable compressor.
– Look for one rated for continuous output near 150 PSI or a max of 150 PSI with a regulator that can be set to 120–150 PSI depending on the tire; this gives you the flow you need without long fill times.
Example: a 2.5 HP, 4-gallon pancake compressor that lists 2.2 CFM at 90 PSI usually refills quickly enough for car tires; use 150 PSI only for high-pressure inflatables like some ATV tires with small volumes.
– If you’ll be refilling multiple tires, get a unit with a fast recovery time (look for higher CFM at working pressure). Short sentence.
Why this matters: prechecking avoids wasted time and air leaks.
2) Prep your fittings, hoses, and settings before you arrive.
- Step 1: Inspect and carry the right fittings—Schrader adapter, Presta adapter, and a couple of quick-connect couplers.
- Step 2: Choose a hose length that reaches every tire without stretching—usually 10–25 feet depending on vehicle size—and avoid coiled hoses that restrict flow.
- Step 3: Pre-set an inline regulator to the target pressure (e.g., 35 PSI for most car tires, 30–32 PSI for light trucks, 12–15 PSI for some flotation tires).
Example: at a roadside job, I clip on a 12-foot hose, attach the Schrader chuck, and set the regulator to 35 PSI before I touch the valve; the first tire fills in under a minute.
Why this matters: monitoring tank and temperature prevents shutdowns and damage.
3) Manage recovery and temperature on site.
- Step 1: Watch the compressor’s tank gauge and let it top up between fills; a small tank (<6 gallons) will require more frequent pauses.
- Step 2: After two or three continuous fills, feel the pump housing—if it’s getting hot to the touch, give it a 5–10 minute cool-down and let the tank refill slowly.
- Step 3: Keep the compressor shaded and elevated off hot pavement to improve cooling.
Example: on a summer job with three SUVs, I limit runs to two tires, let the unit idle for five minutes, and then finish the job so the compressor doesn’t overheat.
Why this matters: precise measurement prevents overinflation and mismatched fittings.
4) Carry gauges and use them correctly.
- Step 1: Bring at least two pressure gauges—a digital and an analog backup—and cross-check readings.
- Step 2: Use your inline regulator to fine-tune output for different valve types and inflate to the manufacturer’s sticker PSI on the vehicle.
Example: when switching from a motorcycle (40 PSI) to a car (35 PSI), I lower the regulator to the smaller target, confirm with the digital gauge, then finish with the analog gauge for a second opinion.
Final practical checklist (do this every job):
- Confirm compressor CFM and max PSI.
- Attach correct fitting and preset inline regulator.
- Use a 10–25 ft hose suited to the site.
- Monitor tank pressure and pump temperature; pause if hot.
- Cross-check with two gauges.
Carry that checklist and you’ll cut downtime, avoid leaks, and keep your compressor running longer.
Using Impact Tools: Match Torque Needs to CFM for Light Fastening
Before you start a fastening job, you need to match your impact tool’s torque needs to the compressor’s CFM so your wrench won’t slow down or stall.
Why that matters: if your compressor can’t supply the airflow the tool draws at operating pressure, your torque will drop and your tool wears faster. Example: I had a 3/4″ impact wrench that felt powerful on the first blow but slowed after the third because the compressor was undersized.
How to do it, step by step:
- List each tool and its rated torque in ft‑lb or Nm. Example: a 1/2″ impact might be 250 ft‑lb, a 3/8″ impact 100 ft‑lb.
- Find the manufacturer’s CFM requirement at the tool’s operating pressure (usually shown as CFM @ 90 psi). Write that next to the torque. Example: 3/8″ impact — 15–30 CFM @ 90 psi; 1″ impact — 60–70 CFM @ 90 psi.
- Check your compressor’s continuous CFM rating, not its peak CFM. Continuous CFM is what it can sustain during repetitive blows.
- Add a safety margin of 10–20% to the total CFM you’ll need so the pressure stays steady under repeated use. Example: if your tools together need 50 CFM, size the compressor for 55–60 CFM continuous.
- Match the highest single-tool CFM to the compressor as well, because one tool running alone still needs enough flow to reach rated torque.
A real-world visual: imagine using a 1″ impact on lug nuts; every blow pulls 65 CFM at 90 psi and your compressor only gives 50 CFM continuously — the wrench sputters after a few hits and you slow down.
Quick checks you can do on the job:
- Look at the tool spec plate for “CFM @ psi.”
- Measure pressure drop with a gauge during continuous firing; if it falls more than 10 psi under normal load, you need more CFM.
- If an impact feels weak after a few blows, it’s airflow, not always the tool.
Practical sizing examples:
- Light fastening with mostly 3/8″ and 1/2″ impacts: plan for 25–40 CFM continuous.
- Mixed shop with occasional 3/4″ wrenches: plan for 40–60 CFM continuous.
- Frequent heavy use with 1″ impacts: plan for 70–90 CFM continuous.
One final tip: keep hoses as short and large-diameter as practical to reduce pressure loss; for example use 3/4″ hose instead of 1/4″ when you expect 40+ CFM.
Mounting & Portability Options: Underhood, Towable, and Lightweight Models
Think of mounting like choosing where to put a battery in a car: where you place the compressor changes how well it performs and how easy it is to use.
Why this matters: your mounting choice affects delivered CFM, line length, and how often you’ll move the unit.
Underhood mounting — what’s good and how to do it
Why this matters: underhood saves deck space and keeps air lines short so you get closer to rated CFM.
1) Steps to fit one:
- Measure under-hood clearance and pick a compressor no taller than that space (e.g., 8–10 inches for many service trucks).
- Use anti-vibration mounts and a steel bracket rated for the compressor weight (common small units are 40–80 lb).
- Run the shortest possible 1/2″ or 3/8″ air hose to tools; keep hose runs under 6 feet to limit pressure drop.
Real-world example: a roadside service truck that installs a 60-lb underhood compressor saved two feet of hose compared with bed mounting and kept tire-impact sockets at full power.
Towable compressors — what’s good and how to do it
Why this matters: towable units give higher CFM and can follow crews so you won’t starve tools on big jobs.
1) Steps to use one:
- Match the tow rating of your vehicle and the trailer hitch class (Class III handles up to 5,000 lb tongue loads).
- Pick a unit with the CFM you need — common site units are 60–185 CFM at 100–125 psi.
- Secure with wheel chocks and use a breakaway cable and safety chains whenever parked.
Real-world example: a paving crew tows a 125-CFM compressor between sites, letting three nail guns and a pavement breaker run without cycling.
Lightweight, portable models — what’s good and how to do it
Why this matters: lighter compressors give fast mobility for inflation, trim, and light fastening.
1) Steps to pick and use one:
- Choose a model under 40 lb if you need to lift it frequently; look for integrated handles and wheels.
- Expect 1–6 CFM at 90 psi for the smallest units and up to ~15 CFM for larger portables; match that to the tools (brad nailers need ~0.5–2 CFM, impact wrenches need 4–6 CFM).
- Keep tank drains accessible and empty daily to prevent water buildup.
Real-world example: a landscaper carries a 30-lb, 6-CFM pancake compressor between sites to inflate tires and run a trim nailer without a truck.
Frequently Asked Questions
Can Compact Compressors Run Multiple Tools Simultaneously Safely?
Yes — I can, but only if I manage run time and air sharing: I’ll balance tool CFM demands, stagger usage, size tank appropriately, and monitor pressure so simultaneous trim, inflation, and light fastening stay safe and effective.
How Do Temperature Extremes Affect Compressor Performance and Maintenance?
Cold starts strain oil and seals, so I preheat or use block heaters; thermal cycling causes fatigue, so I schedule frequent inspections, drain condensate, change oil more often, and store compressors sheltered to maintain performance.
What Noise-Reduction Options Exist for Jobsite Use?
Ironically, you’ll still hear me — but I’ll be quieter: I use sound dampening enclosures, vibration mounts, and muffler upgrades, plus remote placement and acoustic barriers, so your jobsite chatter beats my compressor noise.
Are Oil-Free Compressors Suitable for All Trim and Inflation Tasks?
No — I don’t think oil-free compressors suit all trim and inflation tasks; oil free limitations include reduced longevity and heat under heavy loads, so I’d match tool material compatibility and duty cycle to avoid premature wear.
How Does Altitude Impact Compressor CFM and PSI Output?
Altitude reduces air density, so I tell you compressors need altitude derating: expect lower CFM and PSI. I use pressure correction charts to size capacity, increasing displacement or boost pressure to meet tool requirements at elevation.