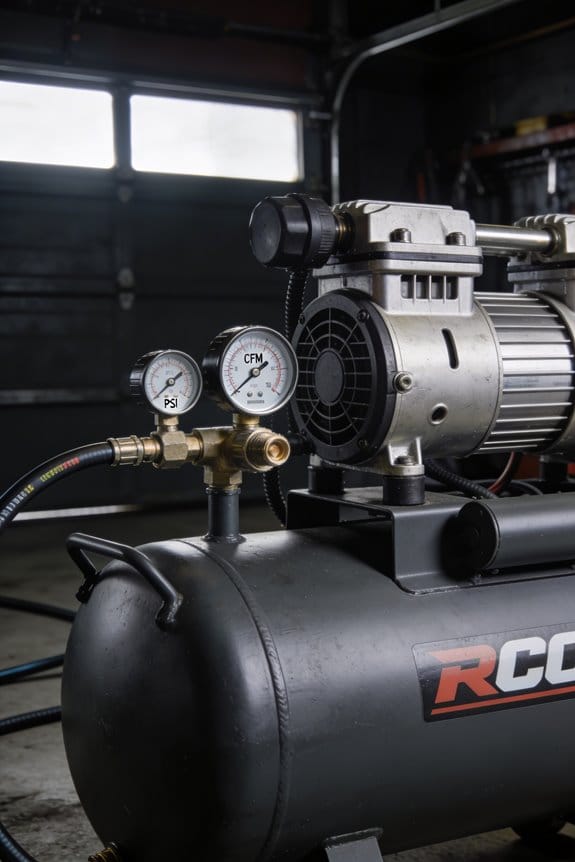
You’re midway through a paint job when your impact gun sputters and slows, and you can’t tell whether the compressor, the hose, or the tool is at fault. You’ve stood there watching PSI bounce on the gauge and wondered exactly why the wrench won’t keep up despite the compressor seeming powerful enough.
Most people confuse PSI (pressure) with CFM (air volume) and assume a high PSI alone solves tool stalls. This article will show you how to match your compressor’s continuous SCFM at the working PSI to the total tool CFM demand, how much extra capacity to add for spikes and leaks, and how to size hoses and tanks so tools don’t lose power.
You’ll get clear, practical checks and quick sizing steps you can use today. It’s easier than it looks.
Key Takeaways
Here’s what actually happens when you match a tool to a compressor: the PSI gives the tool the push it needs, and the CFM feeds it the air to keep running.
– PSI is the pressure that makes a tool operate; match the tool’s required PSI to the compressor’s rated PSI so the tool runs properly. Example: a 90 PSI impact wrench won’t reach torque if you only supply 60 PSI—expect weaker fasteners and slower work.
Before explaining how, here’s why PSI matters: without the right pressure the tool won’t develop required force.
- Check the tool’s spec plate for its required PSI (e.g., 90 PSI for many impact wrenches).
- Make sure your compressor can hold that pressure at load, not just reach it briefly.
- If your compressor’s rated max is 150 PSI but it can only sustain 80 PSI under load, it won’t run your 90 PSI tool.
If you’ve ever had a tool die after a minute, this is why: CFM is the volume of air available per minute and determines how long the tool can run before pressure drops.
– CFM is measured in cubic feet per minute and shows how much air your compressor can deliver continuously; think of it as the fuel flow. Example: a pancake compressor that supplies 2 CFM at 90 PSI will run a 4 CFM paint sprayer for only a short burst before pressure falls.
Before explaining how, here’s why CFM matters: insufficient CFM causes slow operation, stalling, and pressure loss.
- Find the CFM requirement on the tool’s label (e.g., 4 CFM at 90 PSI for a medium paint gun).
- Use a compressor CFM rating that matches the tool’s CFM at the same PSI.
- If the tool needs 4 CFM at 90 PSI and your compressor only supplies 3 CFM at 90 PSI, you’ll get reduced performance.
Think of compressor ratings like speedometer vs actual speed: always compare compressor CFM at the tool’s working PSI, not the compressor’s peak PSI or free-air rating.
– Manufacturers often list “peak PSI” and “free-air delivery” measured at 0 PSI, which overstate usable output; the meaningful number is CFM at X PSI (the PSI you use). Example: a compressor quoted as 4 CFM might only give 2.5 CFM at 90 PSI — check the spec sheet.
Before explaining how, here’s why matching at working PSI matters: it tells you realistic, usable performance.
- Read the compressor spec sheet for the CFM value at the PSI you need (e.g., 3.2 CFM at 90 PSI).
- Ignore the “max PSI” alone; match the CFM@PSI to your tool’s CFM@PSI.
- If the sheet doesn’t list CFM@PSI, call the manufacturer or avoid that unit.
The difference between running one tool and multiple at once comes down to total simultaneous CFM demand.
– Sum the CFM of every tool you run at the same time, then add a safety margin of 25–50% (or multiply the total by 1.5) to avoid pressure sag and startup spikes. Example: if you run two tools that need 4 CFM and 3 CFM simultaneously, total = 7 CFM; with 50% margin you want 10.5 CFM available at the working PSI.
Before explaining how, here’s why a margin matters: air tools draw more on startup and minor leaks reduce effective CFM.
- List tools you’ll use together and note each CFM at the working PSI.
- Add them: Tool A + Tool B + Tool C = total CFM.
- Multiply by 1.25–1.5 for margin; choose 1.5 for frequent startups.
You don’t need fancy gear to keep pressure steady, but you do need the right hose diameter and a tank.
– Use properly sized hose and a receiver tank to reduce pressure drop and increase recovery time under load; for most shop tools use at least 1/2″ ID hose for runs under 25 feet, and 3/4″ ID for longer runs or high-flow tools. Example: a 50-foot 3/8″ hose feeding a 5 CFM sander will drop pressure noticeably; switching to 1/2″ or 3/4″ keeps performance consistent.
Before explaining how, here’s why hose and tank size matter: smaller hoses restrict airflow and small tanks exhaust quickly.
- For short runs (<25 ft) and tools under 5 CFM, use 1/2" ID hose.
- For long runs (>25 ft) or tools over 5 CFM, use 3/4″ ID hose.
- Add a receiver tank (30–60 gallons for medium shop use) to buffer bursts and give the compressor time to recover.
Quick checklist you can use right now:
- Verify tool PSI (e.g., 90 PSI).
- Confirm compressor CFM at that PSI meets tool CFM × 1.25–1.5.
- Use 1/2″ or 3/4″ hose depending on length and flow.
- Add a 30–60 gal tank for medium-duty shop setups.
If you tell me the tools you plan to run and whether they run together, I can calculate the CFM you need and suggest hose and tank sizes.
PSI vs CFM : What They Really Measure
Think of pressure like a push and flow like how much air you get.
Why this matters: if you match only one spec, your tool either won’t start or will die quickly. PSI is force per square inch — it tells you whether a tool will get enough push to operate. Most handheld air tools need about 70–90 PSI to run properly; for example, a 1/2″ impact wrench typically runs at ~90 PSI to deliver full torque.
Why this matters: running out of air stops work and wastes time. CFM measures how many cubic feet of air move each minute, so it determines how long you can keep a tool running before pressure drops. A framing nailer might need 2–3 CFM per shot, and a grinder can need 5–8 CFM continuously; if your compressor only supplies 3 CFM continuous, the grinder will slow or stall.
How pressure and volume interact (brief): pressure gradients cause flow changes because compressors trade volume for pressure. If a compressor fills a 30-gallon tank to 120 PSI but the tool draws air faster than the compressor can replace it, PSI falls. One real-world example: you pull trigger on a 1/2″ impact wrench and hear the motor bog because the compressor delivers 4 CFM but the wrench needs 6 CFM at 90 PSI.
How to match tools to compressors — three clear steps:
- List each tool’s PSI and CFM requirements (example: impact wrench = 90 PSI, 6 CFM).
- Check your compressor’s continuous CFM at the working PSI (not peak CFM); if your compressor is rated 5 CFM at 90 PSI, don’t expect to run that impact wrench continuously.
- Add a buffer: choose a compressor that provides at least 25–30% more CFM than your combined tool demand to avoid pressure sag. If you run an impact wrench (6 CFM) and an air ratchet (2 CFM) together, get a compressor that gives ~10 CFM continuous at 90 PSI.
Quick practical tip: use an inline regulator and a properly sized hose — long, thin hoses reduce flow. For example, a 3/8″ hose over 25 feet can drop usable CFM compared with a 1/2″ hose of the same length.
Quick Sizing Rule : Calculate Minimum Compressor SCFM
Before you size a compressor, you need to know the real airflow your tools demand so you don’t buy something that stalls under load.
When you’re ready, follow these steps to calculate the minimum compressor SCFM you need and why each step matters. Example: a touch-up painter using a gravity-feed spray gun at 40 PSI in a 90°F shop needs accurate SCFM to avoid sputtering finishes.
1) Convert tool CFM to SCFM at your working pressure — why it matters: SCFM accounts for pressure so you compare apples to apples.
- How: use the formula SCFM = (CFM × atmospheric pressure) / (atmospheric pressure + gauge pressure) with pressures in the same units, or consult the tool manufacturer’s SCFM at X PSI chart.
- Example: a die grinder rated 4 CFM at 90 PSI becomes about 3.6 SCFM at sea level and 90 PSI (approximate), so plan on that number.
2) Add every tool’s SCFM to get total demand — why it matters: you need the combined peak draw to size properly.
- How: list each tool and its SCFM, then sum the numbers. Include intermittent tools at their peak SCFM.
- Example: spray gun 12 SCFM + sander 8 SCFM + impact wrench 6 SCFM = 26 SCFM total peak.
3) Multiply the total by 1.5 as a quick sizing rule — why it matters: this margin covers simultaneous use, startup spikes, and headroom.
- How: take your summed SCFM and multiply by 1.5 to get the minimum compressor SCFM. Round up to the nearest whole number.
- Example: 26 SCFM × 1.5 = 39 SCFM, so pick a compressor rated at least 39 SCFM at your working pressure.
4) Correct for ambient conditions and altitude — why it matters: hotter air or higher altitude lowers air density and delivered flow.
- How: if your shop is over 90°F or above 2,000 ft elevation, increase the required SCFM by 10–20% (use 10% for mild conditions, 20% for extreme).
- Example: at 3,500 ft with summer heat, take the 39 SCFM target and add 20% → 46.8 SCFM.
5) Account for leaks and service intervals — why it matters: real compressors lose output over time from wear and leaks.
- How: add another 10% to the SCFM target if you expect routine leaks or long service intervals; add 20% for older systems. Schedule drain and belt checks every month.
- Example: 46.8 SCFM + 10% = 51.5 SCFM; choose a 52 SCFM (or higher) unit.
6) Verify regulatory and practical constraints — why it matters: noise limits, emissions, and space affect what you can install.
- How: check local noise ordinances and emissions rules, and confirm compressor footprint and electrical requirements match your shop. Put the compressor on a vibration pad and plan for sound baffling if needed.
- Example: a 5 HP rotary screw might meet 52 SCFM but may need a 220V 3-phase circuit and a sound enclosure to comply with neighborhood rules.
Quick checklist you can use right now:
- Convert each tool to SCFM at working PSI.
- Sum SCFM values.
- Multiply sum × 1.5.
- Add 10–20% for heat/altitude.
- Add 10% for leaks/aging.
- Confirm electrical, noise, and emissions requirements.
Follow those steps and you’ll pick a compressor that actually runs your tools without surprise drops in pressure.
Why PSI Alone Won’t Make Your Tool Run
Before you judge a tool by PSI alone, know this: PSI only tells you force per square inch, not how much air is actually flowing, and low flow will make your tool stall.
Because PSI doesn’t show airflow, you should check both PSI and CFM (cubic feet per minute) to know if your tool will run. For example: if your impact wrench needs 4 CFM at 90 PSI but your compressor only delivers 2 CFM at that pressure, the wrench will slow or cut out even though the gauge reads 90 PSI. Check the compressor nameplate or manual for CFM, and compare it to the tool’s listed CFM.
Why you should watch the regulator and gauges: a failing regulator can mask real conditions and cause pressure spikes or drops that shorten tool life and wreck fittings. I once saw a paint sprayer start spitting because the regulator diaphram had a tear; the gauge looked steady but the spray pattern pulsed. Listen for irregular cycling and feel hoses for vibration.
Here’s what actually happens when flow is low: the compressor can’t keep up, pressure at the tool drops under load, and the tool either stalls or runs intermittently. Measure the pressure drop by placing a gauge at the tool inlet, then run the tool under typical load for 30 seconds — if pressure falls more than 10–15 PSI, your compressor or lines are undersized.
How to check and maintain your system (steps):
- Check ratings: read the compressor tag and the tool manual for CFM at the operating PSI.
- Measure at the tool: put a gauge at the tool inlet, start the tool under load for 30 seconds, and note the PSI drop.
- Inspect regulator: watch for fast cycling, sudden spikes, or a regulator that won’t hold set pressure; replace diaphragms or the regulator if you see instability.
- Test airflow losses: measure or estimate line length and diameter—long 1/4″ hoses lose a lot of CFM; upgrade to 3/8″ or 1/2″ for longer runs.
- Maintain regularly: drain tanks daily, replace filters every 3 months or when they clog, and check fittings for leaks using soapy water.
If you want a quick rule of thumb, aim for at least 20–30% more CFM at working PSI than your tool’s rated need so you have headroom during peaks.
Practical checks you can do right now:
- Watch the pressure at the tool while you run it; note any drop over 10–15 PSI.
- Swap a long skinny hose for a short thick one and see if the tool runs smoother.
- Put your ear to the regulator and compressor; a rapid on/off cycle or loud hammering means the compressor can’t keep up.
A failing regulator or undersized lines often show the same symptom as low PSI, but the fix is different: replace the regulator or upgrade hoses instead of turning up the tank pressure. For example, changing from a 25-foot 1/4″ hose to a 10-foot 3/8″ hose can restore proper operation for many air tools.
Do these checks before you blame the tool: compare CFM and PSI, measure drop at the tool, inspect regulator behavior, and reduce line restrictions.
How CFM Limits Runtime and Simultaneous Tools
If you’ve ever run two air tools and watched them sputter, this is why.
Why it matters: if your compressor can’t keep up with the air your tools need, they won’t run reliably and you’ll waste time fixing stalls.
CFM controls how long and how many tools you can run at once, not just PSI. Think of CFM as the number of liters of air your compressor can deliver each minute; for example, a 4 CFM compressor delivers about 113 liters per minute and a 6 CFM delivers about 170 liters per minute. If you try to run a 6 CFM nailer and a 5 CFM spray gun simultaneously on a 4 CFM compressor, both will cut out because the compressor is supplying less than the 11 CFM total demand. That causes air starvation and reduced tool power.
How to match tools to your compressor:
- Add up the running CFM of every tool you use at the same time. For instance, two finish nailers at 1.5 CFM each plus a brad nailer at 0.7 CFM equals 3.7 CFM.
- Multiply that total by 1.5 for a safety margin. If your total is 3.7 CFM, plan for about 5.6 CFM.
- Compare the result to your compressor’s rated CFM at working PSI. If the compressor’s CFM is lower, don’t run those tools together.
Example: on a remodel job you want to use a 3 CFM framing nailer and a 2 CFM rotary sander. Total = 5 CFM; with a 1.5x margin you need 7.5 CFM, so a 6 CFM compressor will cause frequent stalls.
Why duty cycles matter: compressors need recovery time to refill the tank between bursts of high use. A tool that draws 10 CFM in short bursts might still work on a smaller compressor if the bursts are brief and spaced out. But if you have continuous-use tools, you need steady CFM.
Steps to prevent overload:
- Stagger tool use so only some run at once; plan sequences by task.
- Add a larger tank to increase recovery time; a 60‑liter tank gives more reserve than a 24‑liter tank.
- Upgrade to a compressor with higher continuous CFM at your working PSI; aim for the 1.5x safety margin.
- Use inline regulators and flow controls to limit unnecessary airflow where possible.
Real-world example: on a deck build you use a 4 CFM framing gun mostly in bursts, but you also run a 6 CFM belt sander continuously for sanding. If you have a 6 CFM compressor with a 24‑liter tank, the sander will starve the gun during nail bursts; adding a 60‑liter tank or switching to a 10 CFM compressor keeps both tools running smoothly.
Practical numbers to remember:
- Add tool CFMs, then multiply by 1.5 for safety.
- Small finish tools: 0.5–2 CFM.
- Framing nailers: 3–7 CFM.
- Continuous sanders/spray guns: 5–12+ CFM.
- Tank sizes: 24 L = small reserve, 60 L = better reserve.
If you match combined tool CFM to compressor output and give yourself a margin, you’ll prevent stalls and keep runtime steady.
Common Compressor Specs for Nailers, Sanders, and Spray Guns

Before you pick a compressor, know why matching PSI and CFM matters: using the wrong one makes your tool run poorly or stall under load.
If you’re choosing for nailers, sanders, or spray guns, follow these concrete guidelines. For each tool type I’ll explain the PSI/CFM target, give a real example, and show a simple selection step.
Nailers: what do they need?
Why it matters: if pressure is too low you get misses; if airflow is too small the gun won’t reset between shots.
- Typical spec: 70–90 PSI and very low CFM bursts (often under 1 CFM during each shot).
- Real example: a framing nailer on a house wall will fire dozens of nails in quick succession; a 2–3 gallon pancake compressor with a 90 PSI max and 1–2 SCFM at 90 PSI usually handles that.
Steps to pick:
- Choose a compressor rated for at least 90 PSI.
- Confirm the compressor can deliver 1–2 SCFM at 90 PSI (or more for rapid-fire).
- If you want cordless convenience, consider a battery nailer to avoid air entirely.
Sander: what do they need?
Why it matters: sanders draw continuous airflow; undersized compressors cause slow sanding and clogging.
- Typical spec: 4–8 CFM at 90 PSI continuous.
- Real example: sanding a 4×8 sheet of plywood with a random-orbit sander takes several minutes; a 20–30 gallon tank and a pump that delivers 5–7 SCFM at 90 PSI prevents pressure dips.
Steps to pick:
- Add up your sander’s CFM at the working PSI (usually 90 PSI).
- Pick a compressor that provides at least that CFM continuously — aim for 20–25% headroom.
- Prefer a larger tank (20+ gallons) for steady output during long passes.
Spray gun: what do they need?
Why it matters: spray guns need steady flow to keep the pattern even; low CFM causes pulsing and runs.
- Typical spec: 6–12 CFM at 40–60 PSI, depending on the gun and nozzle size.
- Real example: spraying a car door with a gravity-feed HVLP gun needs continuous 8–10 CFM at 40 PSI; a compressor rated 10–12 SCFM at 40 PSI or greater with a 30+ gallon tank keeps the coat uniform.
Steps to pick:
- Check the gun’s CFM at its recommended PSI (often 40–60 PSI).
- Choose a compressor that delivers that CFM at that PSI, plus ~25% extra.
- Use a tank sized to the job (30+ gallons for automotive work).
Final checklist you can use right now
Why it matters: a quick checklist prevents buying the wrong unit.
– Example: buying for a home shop where you’ll sand and sometimes spray primer — choose a compressor that does 7–8 SCFM at 90 PSI and has a 30+ gallon tank so you can run both tasks without pause.
Steps:
- Write down each tool’s PSI and CFM.
- Use the highest PSI required and the highest continuous CFM required as your baseline.
- Add ~25% to the CFM baseline and pick a tank size appropriate to the task length.
If you follow those steps, you’ll match your tools to the right compressor and avoid stalls, pulsing, and wasted money.
Troubleshooting Mismatches: Symptoms, Causes, and Fixes
If you’ve ever had a compressor that didn’t keep your tool working, this is why.
Why this matters: if your tool loses power it slows your work and can ruin a finish or a nail run. Example: you’re spray-painting a kitchen cabinet and the gun sputters mid-coat, leaving dry spots and runs.
Symptoms, causes, and fixes
1) Why a tool sputters or loses power
Why this matters: a sputtering tool means not enough airflow where it’s needed. Example: your finish sander hesitates and leaves swirl marks on a maple tabletop.
Steps:
- Check gauge behavior: if the pressure needle cycles up and down while you work, your compressor’s CFM output is too low or the PSI is falling.
- Measure CFM demand: look at the tool’s rated CFM (e.g., spray gun 10–12 CFM at 40 PSI) and compare to the compressor’s rated CFM at the same PSI.
- Fix small leaks: listen for hissing at fittings and along hoses, then spray soapy water on joints; bubbles show leaks — tighten or replace the fitting.
- Replace undersized hoses: 1/2″ ID hoses lose less flow than 3/8″ at long runs; swap to 1/2″ if your hose is long.
2) Why the compressor runs constantly
Why this matters: constant running means the tank can’t store enough air for your work pattern and your motor wears faster. Example: you’re nailing a roof deck and the compressor never reaches cut-out between nails.
Steps:
- Check tank size vs. duty: for intermittent tools like finish nailers, a 6–8 gallon tank often suffices; for sustained tools like framing nailers or continuous spray work, use 20+ gallons.
- Add capacity or reduce load: either get a higher-capacity compressor (higher CFM and larger tank) or stop running multiple tools at once — use one tool at a time.
- Use a secondary receiver tank: add a 10–20 gallon receiver near your work area to buffer short bursts.
3) Why pressure spikes then falls
Why this matters: unstable pressure ruins precision work and stresses tool valves. Example: a pneumatic stapler fires hard then weaker, leaving inconsistent fastener depth on trim.
Steps:
- Inspect the regulator: set the regulator to your tool’s required PSI and watch its response; if it jumps above then collapses, the regulator is likely failing.
- Check the tool’s internal valve: remove the tool’s valve assembly (refer to the manual), clean deposits with a parts cleaner, and replace worn seals or springs if they stick.
- Replace faulty parts: if the regulator’s internal diaphragm or spring is damaged, replace the regulator.
Quick checklist you can run in 10 minutes:
- Confirm tool CFM and PSI requirements.
- Read compressor CFM at operating PSI.
- Listen and soap-test for leaks at fittings and hoses.
- Check hose diameter: use 1/2″ ID for long runs.
- Watch gauge for cycling behavior.
- Consider tank size: 6–8 gal for light intermittent work, 20+ gal for continuous use.
One last practical tip: when shopping, prioritize CFM at the PSI you use, not just peak PSI — a compressor rated 5 CFM at 90 PSI might be useless for a 10 CFM spray gun at 40 PSI.
Setup Tips to Prevent Pressure/Flow Loss (Hoses, Regulators, Storage)
If you’ve ever had tools slow or stall mid-job, this is why.
Why it matters: uneven pressure or flow ruins finishes and can damage tools in seconds. Start by treating your compressor system like a network: hoses, regulators, and storage tanks must all match the demands of your tools so pressure and flow stay steady.
1) Which hose should you pick?
Why it matters: the wrong hose causes pressure drop and reduces tool power.
Steps:
- Match hose diameter to your tool’s CFM: for 1–3 CFM (brad nailers), use 3/16″ or 1/4″ hose; for 4–8 CFM (finish nailers, small impact drivers), use 3/8″; for 10–30+ CFM (air sanders, grinders), use 1/2″ or larger.
- Keep runs short: every 50 feet of 1/4″ hose can drop 5–10 psi at moderate flow; aim to keep critical tools within 25 feet when possible.
- Use smooth-bore or reinforced hoses for long runs; it reduces turbulence and pressure loss.
Real example: I ran a 25-foot 3/8″ hose to a finish nailer and kept steady 90 psi; switching to a 1/4″ hose dropped me to 78 psi under load.
2) Where should you put regulators?
Why it matters: regulator placement controls the actual PSI at the tool so you get consistent operation.
Steps:
- Install a regulator within 6 feet of the work area for spray guns and precision tools.
- Use a second regulator at the compressor set slightly higher if you need a wide-range setup—primary near the tool, backup at the source.
- Choose regulators rated for the PSI you use (most shop air tools run 90–100 psi).
Real example: I added a regulator at my spray booth 4 feet from the gun and eliminated the pressure swings I used to see when others used tools at the same time.
3) How much storage (receiver tank) do you need?
Why it matters: a receiver tank buffers short bursts so the compressor doesn’t cycle or starve tools.
Steps:
- Size by demand: for intermittent 1–5 second bursts (nail guns), add 5–10 gallons; for continuous pneumatic sanders or multiple tools running, add 20–60 gallons.
- Match tank size to compressor CFM: if your compressor delivers 6 CFM, a 20-gallon tank gives a useful buffer for brief spikes.
- Place the tank between compressor and work area to stabilize flow.
Real example: adding a 30-gallon tank to my 5 CFM compressor stopped frequent low-pressure events when two people used air tools simultaneously.
4) How to minimize losses from fittings and leaks
Why it matters: each fitting and leak reduces your available PSI and wastes compressor time.
Steps:
- Minimize the number of fittings—every quick-connect or elbow adds resistance.
- Use thread sealant tape or PS thread sealant and quality quick-connects rated for your PSI.
- Inspect joints monthly with soapy water and fix bubbles; even a small leak can cost hours of compressor run-time per week.
Real example: sealing two tiny fittings on my line stopped a 3–5 psi drop under load and cut my compressor runtime by about 30 minutes daily.
Quick checklist to balance capacity and expected CFM draw:
- List each tool and its required CFM at working PSI.
- Ensure your compressor CFM at working PSI meets or exceeds the total expected simultaneous draw.
- Use hose diameters and lengths per step 1, regulators near each work area per step 2, and receiver tanks sized per step 3.
- Inspect fittings and leaks monthly.
Follow these steps and you’ll stop guessing and start getting steady pressure and flow at the tool.
Frequently Asked Questions
How Does Altitude Affect Compressor SCFM and PSI Requirements?
Altitude derating matters: I tell you lower air density and reduced oxygen content at altitude reduce SCFM and effective PSI, so I adjust equipment calibration and increase compressor CFM/pressure ratings to compensate.
Can Oil-Free vs. Oil-Lubed Compressors Change Tool Longevity?
By golly, yes — I’ve seen oil-free advantages: cleaner output and lower maintenance that protect some tools, but oil-lubed compressors last longer internally; oil lubed drawbacks include contamination risk and extra upkeep that can shorten tool life.
What Maintenance Schedule Preserves Rated CFM and PSI?
I recommend I change filter replacements monthly, drain tanks weekly, inspect hoses and belts monthly, perform pressure calibration quarterly, oil and service compressors per manufacturer schedules, and test CFM/PSI under load annually to preserve ratings.
How Do Ambient Temperature Extremes Impact Performance?
Cold starts reduce CFM and delay PSI build; I’ll preheat lines and use thicker oil. Thermal expansion in heat raises pressure readings and leaks risk, so I monitor temps, adjust regulator, and inspect fittings regularly.
Are Electric Motor Sizes Tied to Achievable CFM at Working PSI?
About 80% of failures trace to undersized drives—I’ll say yes: motor selection directly limits achievable CFM at working PSI, so I match motor power to compressor load matching specs to guarantee sustained flow and pressure.